Using Runtime Workflow
Workflow is a powerful module-based automation tool built into Runtime that allows developers to combine Runtime’s ability to execute proprietary software with powerful scripting languages like Powershell, and to integrate SQL commands, alongside other modules. This way, users can create complex automation for their test data pipeline whilst having the ease of use of a module based interface.
Why use Workflow?
In the test data generation/subsetting/masking pipeline there are usually many processes that happen before or after data is modified. Think of an e-mail being sent out to testers notifying them that their environment is ready to be used, or the renaming and storage of audit files for later reference by a security officer. Workflow is intended to give you the tools to perform a multitude of tasks to further automate the workflow of administrators and testers alike.
A good example would be to creating one or multiple fresh dataset(s) for testers to use. Usually, this involves the following steps:

Instead, now you can automate all these steps in a single click, and be notified whenever specific modules fail. If you’d like to see how we automate this process, you can follow the Runtime Workflow Training, in which we make a robust demonstration Workflow.
Creating a Workflow
In order to create a new Workflow, follow these steps:
- Navigate to Runtime, and select “Workflows” from the menu items on the left-hand side.
- On the top-right corner of this screen, select “New Workflow”.
- You should now see the new Workflow open.
Deleting a Workflow
To delete a Workflow, navigate to the main Workflows menu and click on the “Options” button. A drop-down menu should now open. Select “Delete”. This will permanently delete the Workflow.
Viewing a Workflow
To view a Workflow, navigate to the main Workflows menu and click on the title of the Workflow. This will generate the contents of the workflow for you to view. Data cannot be modified from this view, and the contents of individual modules cannot be viewed. When viewing a workflow, the right-hand button where “Options” was in the main workflow view now displays three buttons, which are detailed below.
Execute
This will run the Workflow, and perform the contents of all of its modules. While the system is busy executing the Workflow a user can interrupt and stop the execution at any time by pressing the “Abort” key, which temporarily replaces the “Execute” key whilst the Workflow is running.
After a run has finished (either successfully or with errors) you can click on the modules in the overview screen and consult the Logging and Output to see how a module has executed. If a module has failed, usually the logging will contain an indication of what went wrong.
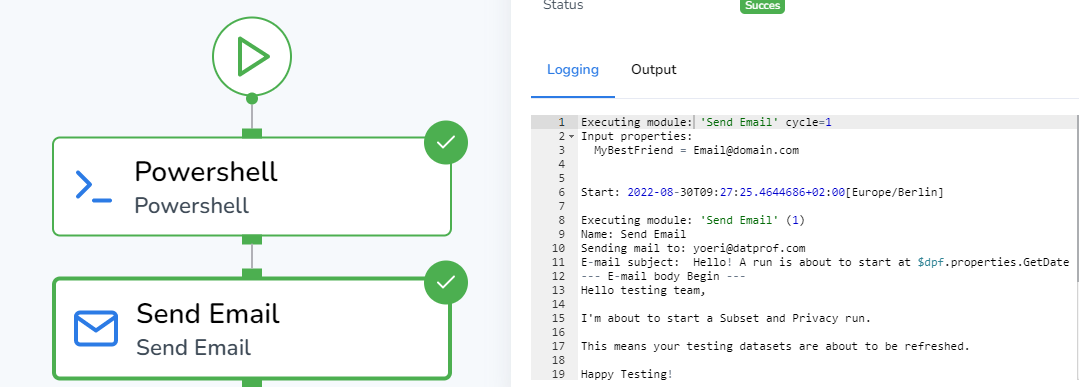
After executing a workflow you can see whether or not the various modules have succeeded. If you click on a module (like the “Send Email” module in this example), you can see a detailed log of its execution.
Edit
This will open the editor, and allow you to edit the Workflow. Editing will be handled later in this document in greater detail.
History
This button will open a drop-down menu that details past runs. Here, you can see the date and time the run was executed, and whether the run has succeeded or failed. If you click on an earlier run in this menu Workflow will re-generate what that specific run looked like, and enable you to click on the modules to see what they logged at the time of their execution. At the bottom of the drop-down menu it’s possible to select “Clear History”. This will delete the execution history for this specific Workflow.
Editing a Workflow
To edit a Workflow, navigate to the main Workflows menu and click on the “Options” button. A drop-down menu should now open. Select “Edit”. This will generate a graphical view of the modules contained within this Workflow, and enable you to modify it.
Renaming a Workflow
In this menu, you can see the name of the Workflow in the top-left corner. By default this will be “New Workflow”. To rename it to a more suitable name, click on the name, delete the current name, and replace it with your intended name.

You can rename a Workflow to be called whatever you’d prefer! Diacritics and special characters are supported.
Save and close, Save & Cancel
When you’re satisfied with your Workflow you can “Save and close”. This will save any changes made, and navigate the user back to the main Workflow menu. “Save” will save any changes made to the Workflow. “Cancel” will undo any changes made since last saving, and navigate the user back to the main Workflow menu.
Understanding modules and the Workflow process
Modules are self-contained instruction sets that can be configured by users. These range from fairly simple modules, such as the Sleep module, who’s sole purpose is to wait for a specified amount of time when it’s called upon, and once that time has passed, to pass on a command to run to the modules that follow it, to modules such as the Powershell module, which are more of a framework wherein a developer can specify any Powershell command to be executed when the module is called upon.
The Start Module
Every workflow begins with the start module. This is a circular module who’s sole purpose is to send a starting signal to any module that it is connected to. Every Workflow contains one, and it cannot be deleted. You cannot add additional start modules.

Adding a Module
In order to add a module, simply drag and drop it from the list of modules into the graphical interface.
Deleting a Module
In order to remove a module, click on the module and click on the delete button that is generated on the top right corner of the module’s body. The button depicts a garbage bin.
Be careful when deleting modules, as the data stored within a module’s configuration will be lost upon deletion.
Module Settings
Clicking on a module while editing the Workflow will open its options menu. Here, you can rename and configure the module. As the options available are specific to the module type, we will be handling this in a later chapter, where we look into each module.
Signal Input & Output handles
Modules are interconnected. Every module has a signal input, and a signal output. These are protrusions on the body of the module within the graphical representation of the Workflow. Generally the input of a module is on top of the module, and the output is on the bottom.

The Powershell module has grey squares attached to the top and bottom side of it to indicate input & output handles.
Connecting Modules
To connect two modules, simply click on the output handle of one module, and drag it to the input handle of another module. A module can have multiple connections to its input and output handles. In order to remove a connection, simply click on the grey line that connects modules, and click the blue button that’s depicted within.
Multiple incoming connections
If a module has multiple incoming connections, it will get triggered every time a preceding module has finished. I.e.: if a module has 4 modules preceding it, and those 4 modules finish, the module will be executed 4 times as well.
Multiple outgoing connections
If a module has multiple outgoing connections it will generally send a signal to all connected handles once it has finished running. It is however possible for the output to be filtered (Such as through the usage of the “IF” and “Result Switch” modules), which will be discussed later.
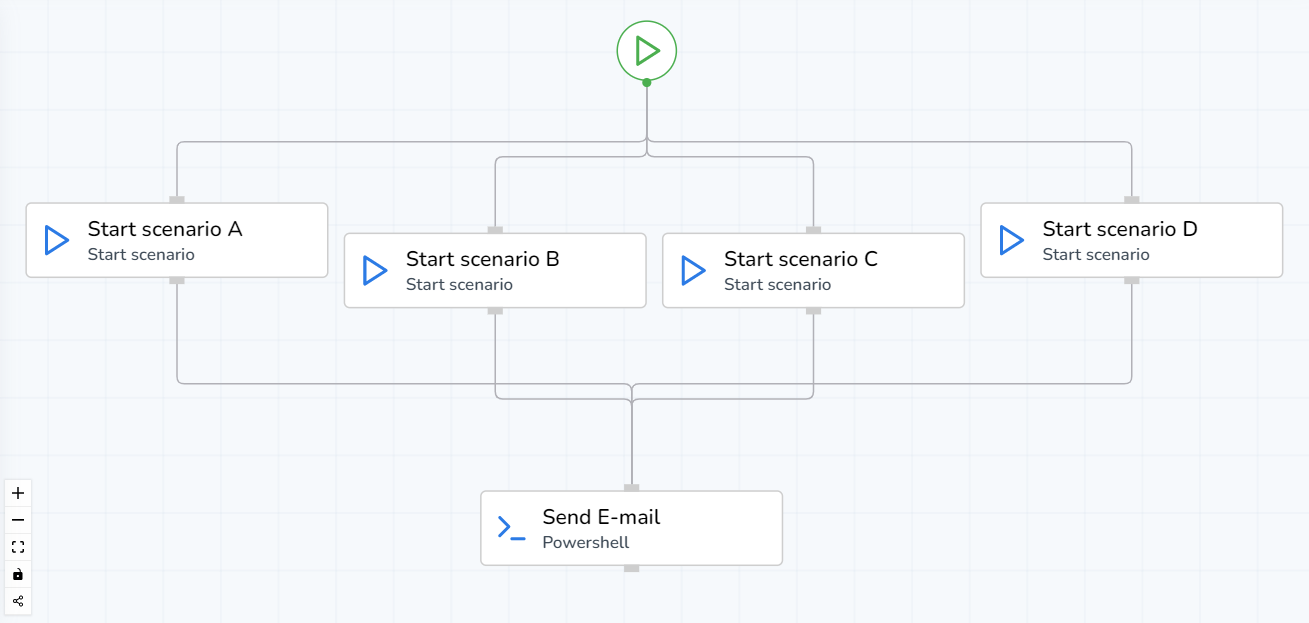
In this example we have multiple outputs. The Workflow will start, and send Start Scenario A, B, C & D a signal to start simultaneously. After each scenario has finished its run, it will send a signal to “Send E-mail”. If all four scenarios succeed, “Send E-mail” will be executed four times.
Data output
Some modules can store data generated by their successful execution as output properties. This is a feature that allows you to generate certain information (i.e.: the selection of fields from a SQL database, or the pulling of data from the OS through the usage of Powershell), and then use it in modules that follow it. In the Powershell chapter, you can see how to define an output. Some modules, such as the “Start Scenario” module allow you to input static parameters to be used in the Workflow
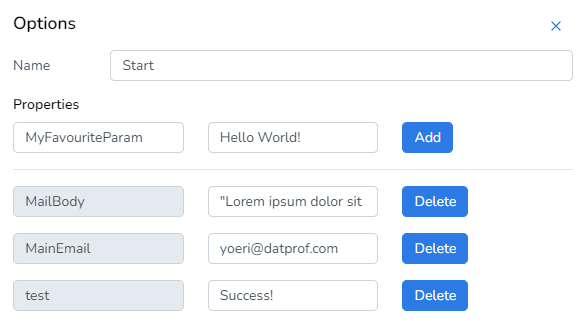
After clicking on the “Start Scenario” module. you’re automatically greeted by this menu. Here, you can add and remove parameters. Every parameter needs a name, and a value.
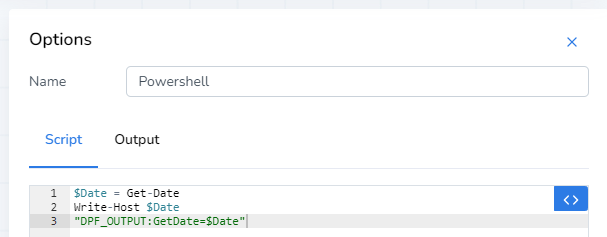
In the Powershell module, you need to denote something in the script as an output parameter. The syntax for this is {“DPF_OUTPUT:<parameter_name>=<parameter_value>”}. Because we parse the output of the Powershell in to find our own specified Workflow outputs, it’s good practice to write any outputs to host in the Powershell script.
Module Types
Start Scenario
The “Start Scenario” module facilitates the execution of DATPROF Privacy and Subset templates, and can be thought of as the same functionality as Runtime’s run execution distilled down into a module. All configuration of the applications this module executes must be done in Runtime, as per the usual route.
Environment
Here you can input a Runtime Environment for the module to use.
Application
Here, you can select an application to be used from the preceding environment.
Scenario
Here, you can define which scenarios you would like to run in the preceding application.
Result switch
The “Result switch” module allows you to parse the outcome of a preceeding module, and redirect the signal flow. If the preceeding module succeeds, the workflow continues from the “onSuccess” handle. If a preceeding module generates an error the workflow continues from the “onError” handle.
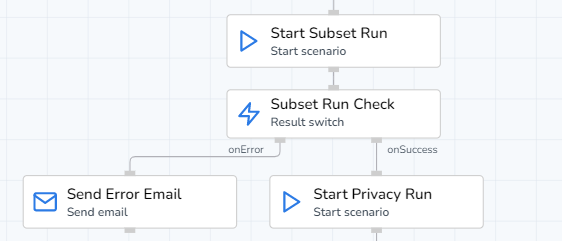
Here, the result switch performs a basic function. If the preceeding scenario module fails, the result switch sends a signal via the onError handle to a send email module. Then, the user is notified in their mailbox that there has been an error in the run. If the scenario module succeeds a signal is passed through the onSuccess handle to a module that starts a privacy run on the same dataset.
Send Email
The “Send Email” module makes and sends an email after the preceding module has finished. In order to use this module, mail server settings have to be configured beforehand. You can do this by navigating to your Runtime installation folder, and then the DATA folder. here, you’ll find the “mail.properties.example” file. Open this file, and then follow the instructions within the file. Both SMTP and SMTPS connections are supported.
After editing the mail.properties.example file make sure to save it as mail.properties. If you forget to change the extension Runtime will be unable to detect the file, and signal that there is no valid installation.
Recipient
Here, you can specify the recipient for the email by either manually inputting a static address, or by using an output parameter to define one or multiple recipients.
Subject & Body
Here, you can specify the header/subject and body of the e-mail.
Attachment
You can include attachments in your e-mail. This is done by selecting a parameter through the “< >” button. Some modules (such as the run environment module) generate attachments natively, and can easily be included in the e-mail.
Sleep
The “Sleep” module facilitates a waiting function. When it is called, it will “process” for the defined amount of seconds, and then succeed. Currently only integers (whole numbers) can be supplied as an amount of seconds.
If
The If module is a true/false gate that can redirect an input signal depending on a condition. You can supply two values (Value 1 and Value 2), and whether you want to compare if they are equal or unequal. If the comparison is TRUE, an output signal is sent from the true handle. If the comparison is FALSE, then a signal is sent from the FALSE handle.
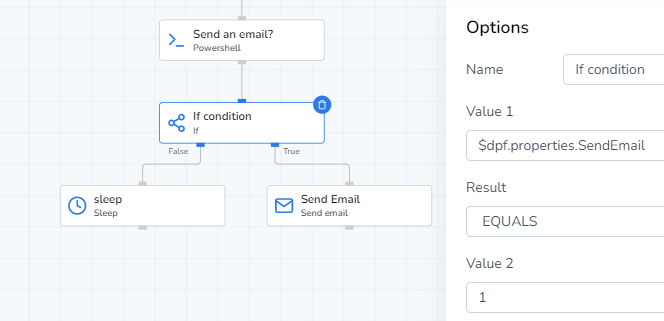
In this example, we’re demonstrating the usage of the If module by using an Powershell module before it that determines whether we need to send email to a tester or not. Here, the Powershell module generates a parameter called “SendEmail”. We then compare this value to a number. If SendEmail equals 1, then the condition is true, and a signal will be sent to the Send Email module. If SendEmail is not equal to 1, the sleep module will be called.
Powershell
The Powershell module exists to execute Powershell scripts, and directly interfaces with the operating system on the console where Runtime is installed. This can be used to prompt other programs to perform various tasks.
Script
You can define a Powershell script in this field. Regular PowerShell syntax can be used here.
Properties (output)
In Powershell, you can generate properties to output to the Workflow interface. These can then be used in proceeding modules.
In order to do this, use the following syntax in your script:
Write-Host "DPF_OUTPUT:propertyname=propertyvalue"
The easiest way to use this would be to define a result of your script into a Powershell variable, for instance “$ResultEmail”, and then use that in this output.
Write-Host "DPF_OUTPUT:MyFavouriteContact=$ResultEmail"
you can also define a set value here, such as:
Write-Host "DPF_OUTPUT:MyFavouriteContact=bestfriend@domain.com"
Handling errors
The Powershell module doesn’t catch script errors and will often “pass” while not giving the results you might expect if the script is incorrect. A quick workaround for this would be to introduce a trap at the start of your script. This will catch exceptions and make the script fail.
Trap {
  # Catch any exception (incl. syntax errors in this script) and let this module fail.
  Write-Host $_
  Exit 1
}
Execute SQL
The Execute SQL module does just that – it executes a specified SQL query on a designated Environment. This can be used to modify the database, or to select and store data in the log of the module.
Environment
Here you can input a Runtime Environment for the module to use. This will act as the database connection the module uses and runs its query against.
The Command Toolbar
On the left side of the screen, next to the catalogue of modules, there’s a small toolbar of commands. From top to bottom they are:

Zoom in on the graphical interface with fixed distance intervals
Zoom out on the graphical interface with fixed distance intervals
Fit the entire chart of modules into the current screen selection. This button zooms in or out, and readjusts the view so that every module neatly fits into the available screen space.
Lock/unlock the current state of the Workflow. Toggling this button disables editing and moving modules. It does not prevent you from moving the view by mouse dragging in the graphical interface, or consulting the details of each module by clicking on them.
Readjust the position of modules so that they form a symmetrical and ordered tree. For an example, consult the image below.
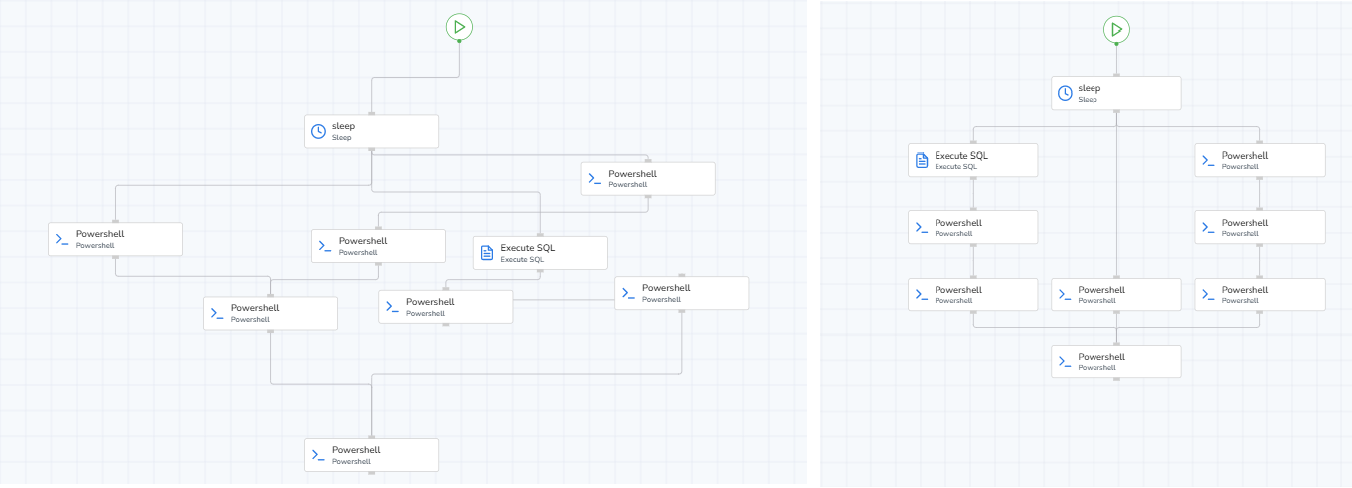
In the example on the left the modules are intentionally jumbled and arranged in a difficult to read manner. After using the reorganize button from the toolbar, the modules are automatically rearranged to better display the inter-dependencies and to provide a better overview, as per the example on the right-hand side.
