Project Settings
In this chapter the configuration settings of the Project settings screen are explained per category. In this screen, the user can specify source & target database connection, configure the schema mapping and perform other tasks usually needed at the start of template creation.
Source connection and target connection
Every project starts with defining a source and target database for the template. In very general terms the source database is the database where the eventual subset data is pulled from, and the target database is the database where data eventually is inserted to create a (comparatively smaller) dataset.
Source connection
The Source connection is used for two things.
Importing the data model before development
Fetching the data to be subsetted from the source database during deployment.
For the Source database only Select permissions are required on the user specified in the Subset interface.
Target connection
The Target database is used for the following purposes.
Counting tables in the Source database will always be executed from the Target database.
An exception to this lies with projects using DB2 for Linux, Unix & Windows (LUW), which will execute the count directly on the Source database due to database design limitations.During deployment the Subset will be saved in the target database.
You need Create and Write permissions in the Target database.
You need Read permissions in the Source database for the user in the Target database.
Connection editor
Users can enter and select connections in the Connection Editor. Use the buttons Edit Source connection and Edit target connection to edit each connection respectively.
The left part of the Connection editor is used to present earlier saved connections. When using DATPROF Subset for the first time, this section will be empty.
Saved connections
The left-hand menu of the connection editor represents any existing database connection which have been saved using the save option. Upon using Subset for the first time, this menu will be empty. In this overview, a few key values are represented:
Database – The host value specified in the connection editor. Depending on which database type is saved, the database name, database user or SID/service may be appended.
User – The database user specified in the connection editor.
Type – The database type specified in the connection editor.
Where are my connections saved?
All connections are saved to “Subset_connections.lst”. This is located in the AppData registry.
Example:
<Windows User>\AppData\Local\DATPROF\Subset
Creating a new connection
On the right side of the connection editor new connections can be entered and tested. Because various database types are supported, and each database type requires different connection information, the values provided are broken down into separate chapters below.
After supplying connection details, the user can click on the Test button to check the connection’s validity. Using the Save button, the connection data can be stored for later use, and is represented in the saved connections menu. An important addendum is that by default, a connection will save without the configured password. The checkbox Save password will save the password encrypted in storage.
A Subset project always consists of two data connections of the same Database type. Creating a Subset from Oracle to SQL Server or otherwise is not part of the functionality, as the different SQL variants and differences in various networking/administration settings between different SQL databases make cross-platform queries too complex and prone to issues.
Managing your sensitive data when contacting DATPROF
It’s entirely possible that when depending on our staff for support of our systems, the topic of transferring your project file to DATPROF comes up. Luckily, due to the way we design our software we don’t handle the data within your database, and a project doesn’t contain any sensitive data about your datasets. However, because it’s possible to store and save the connection data to databases in our software a project file can contain privacy or security risk bearing connection data. Therefore, if you would like us to look at one of your project from a support perspective we strongly urge you to delete any existing connection data in the Connection Editor.
As this is information we have no desire to have within our system, and could contain sensitive information, we will prune this information in any event this is attached erroneously to protect our data privacy conformity. Nevertheless, it falls to the submitter of any ticket to be wary of privacy sensitive data and remove it where possible.
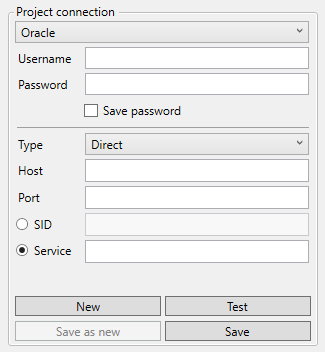
Oracle
Connection Type: ORACLE.
Host: Hostname or IP-address of the database server.
Port: TCP Port
SID / Service: Unique database identification.
Schema: Schema name.
Oracle database link
When using a Oracle the database DATPROF Subset requires an Oracle Database link. This Database Link must be entered in the Project Settings screen.
During Deployment DATPROF Subset will use the Target database to execute the queries to collect the data from the Source database using this Database link.
The user that is used for the Target database must have proper permissions to create a database link. If that is not the case a database administrator must create the database link manually. After this, the name of the database link can be entered, and Create on target DB toggle can be disabled.
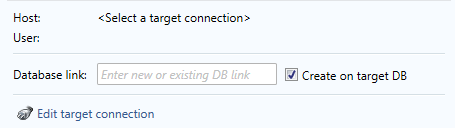
There are two settings which can be altered:
The name of the new or existing Database link.
The choice to create the Database link during Deployment or not. By default, this option is on. If the Database link already exists the checkbox must be unchecked.
If the deployment of DATPROF Subset fails and the “Create on target DB” checkbox is checked, the database link will not be deleted. Executing the Subset process again will fail because it cannot create the already existing database link. Drop the database link manually or uncheck the checkbox next to the Database link name.
Microsoft SQL Server
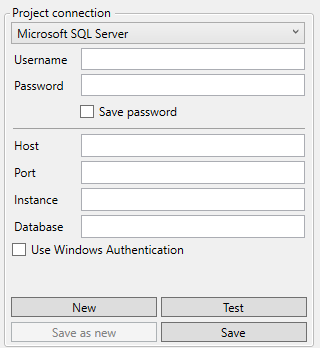
Connection Type: MSSQL.
Host: Hostname or IP-address of the database server.
Port: Port of the SQL Server database.
By default this is 1433.
When empty, the default port will be used.Instance: If a named instance is used, fill in this field with the name of the instance. This property is optional, then the default instance on the host is used.
Database: Name of the database
Use Windows Authentication: Use your windows authentication to log on to the SQL Server database. Using the Windows authentication for both Source and Target connection can cause a “double hop” , which is undesired.
DB2 for Linux, Unix, Windows (LUW)
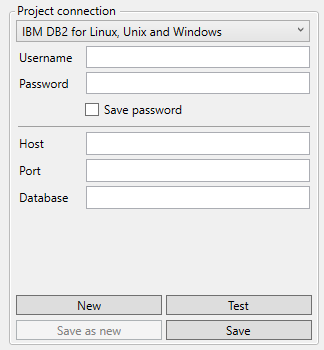
Connection Type: IBM DB2 for Linux, Unix and Windows.
Host: Hostname or IP-address of the database server.
Port: Port of the database server.
Database: Name of the database.
DB2 Server name
When DB2 for LUW is chosen as the type of connection, Subset uses a DRDA connection that is created by a database administrator. A “Server” is created with a DB2 Server name. You can read more about this topic in the Installation chapter of this manual.
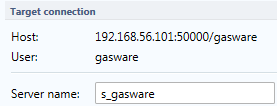
The server name must be entered in the project settings screen below the Target connection.
DB2 for iSeries
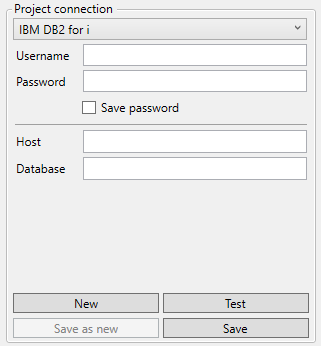
DATPROF Subset for DB2 for iSeries works different compared to the other database types. DB2 for iSeries uses the same database for both Source and Target. Using the schema mapping, the Subset will be created in a different schema than the source tables.
There is no Target connection or “Server name” to be entered when using IBM DB2 for i
Username: The database user name.
Password: The database user password.
Host: Hostname of IP-address of the database server.
Database: Name of the database.
DB2 for z/OS (Mainframe)
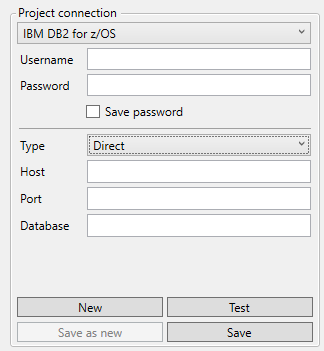
Username: The database user name.
Password: The database user password.
Type: Either direct, which supplies all the connection data in fields or connect descriptor, which allows a JDBC connect string.
Host: Host name of IP-address of the database server.
Port: The port over which a connection to the database can be made.
Database: Name of the database.
Connecting through the connect descriptor
When connecting to a DB2 z/OS database, it’s possible for the user to supply a JDBC connect string instead of supplying individual values. In some situations, this is required (such as when the mainframe database requires a certificate to connect to it). For a complete overview of the syntax for DB2 z/OS connect strings, please refer to the following page of the IBM documentation:
JDBC connect string example:
Syntax:
jdbc:db2://<database_host>:<port>/<database_name>:sslConnection=true;sslTrustStoreLocation=<full_path_to_jks_file>;sslTrustStorePassword=<trust_store_password>;
Example:
jdbc:db2://My-Favourite-Database:8102/PRODUCTION:sslConnection=true;sslTrustStoreLocation=C:\users\me\certificates\db2Zstorecert.jks;sslTrustStorePassword=changeit;
PostgreSQL
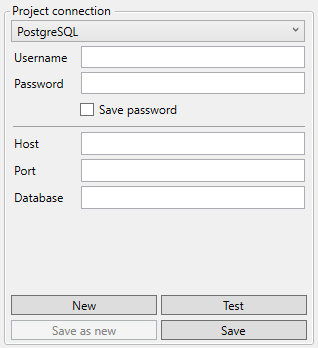
Username: Database user
Password: Password for database user
Host: hostname or IP adress
Port: Portnumber of the database server
Database: Name of the database to obtain metadata from.
MySQL / MariaDB
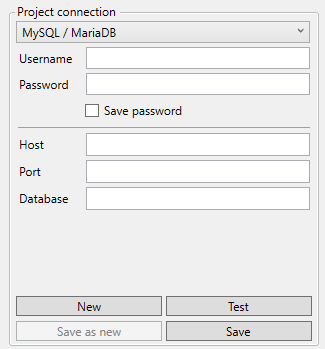
Username: Database user
Password: Password for database user
Host: Host name or IP address
Port: Port number of the database server
Database: Name of the database to obtain metadata from
Validate Project settings
The Project Settings selections can be validated by using the button Validate connection details on the left-hand side of the project settings page. Different checks are executed depending on which database type is being used. To see which checks are executed on a specific database, consult the overview below.
Microsoft SQL Server
Source Connection
Target Connection
Oracle
Source Connection
Target Connection
Database link
DB2 for Linux, Unix and Windows
Source Connection
Target Connection
Server name*
*The Server name can only be validated if the Metadata is imported and the Target Schema is selected.
DB2 for i
Source Connection
DB2 for z/OS
Source Connection
MySQL / MariaDB
Source Connection
Target Connection
PostgreSQL
Source Connection
Target Connection
Import Metadata
After the Source connection is selected, the data model of that database can be imported. The Metadata of this data model is saved in the project file and will be the starting point for further development.
The import process consists of three steps.
Select which tables you want to import
Select which foreign keys you want to import
Import the data model and foreign keys
Use the Import meta data button or select menu option Project -> Import and synchronize -> Import meta data wizard…
A new wizard window will open showing the tables of the Source database.
Views are ignored in the import Metadata wizard.
Table configuration
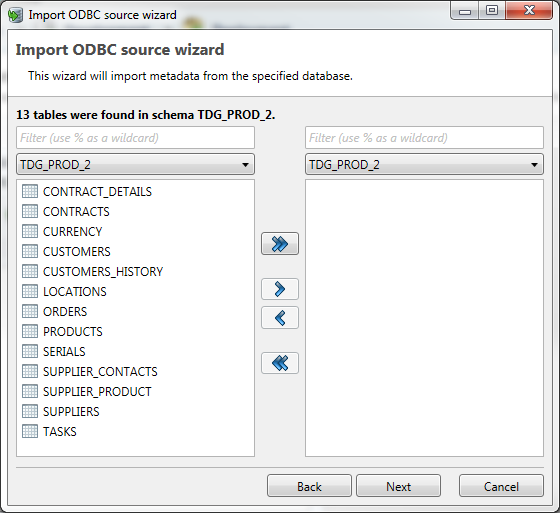
The user can import tables across multiple schemas. In order to switch between various schemas, click the drop-down box in the top-left corner of the import wizard, and select the desired schema to import from. After having selected the desired schema, you should see an overview of all the tables within said schema in the left-hand box. The right-hand box indicates all objects that will be imported if the user presses next. In order to move tables into this box, the user can use the ‘>' and ‘<’ buttons to move a single highlighted table to the right or left box respectively. Similarly, pressing the ‘>>’ or '<<’ will move all tables within the selected schema either to the right-hand or left-hand box.
If you’d like to selected multiple tables quickly, using CTRL or SHIFT in combination with the arrow keys or the left mouse button will select multiple tables at once.
Searching tables
Users can easily filter out specific tables by defining a filter using the search box above the table overview boxes. The percentage sign '%' can be used as a wildcard. After entering a search query the ‘>>’ and ‘<<’ icons will move all currently filtered tables.
Click next to proceed to the Foreign Key section of the wizard.
Foreign Keys
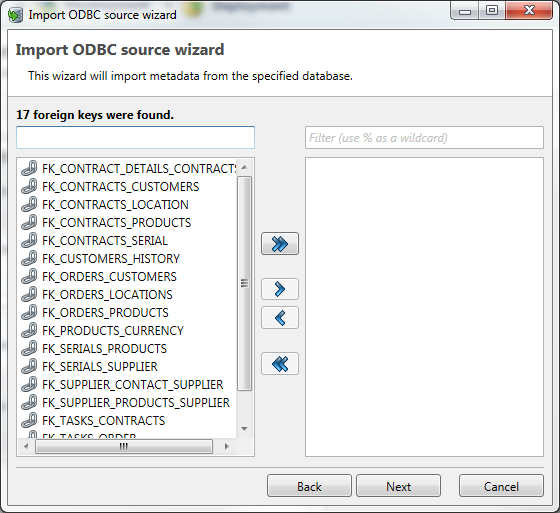
This part of wizard can be used to select Foreign Keys to import. The functionality of this screen is identical to the Table configuration screen, with that exception that no schema selection is available.
The list of available Foreign Keys is derived from the previously selected tables or the tables already imported. Choosing Foreign Keys is optional. Care should be taken however that if the foreign keys from the original dataset also exist on the target environment, this means that any constraints on the data should be adhered to, to prevent a possible error during run execution.
Press Next to go to the last screen or Back to return to the Table selection screen.
Import Metadata
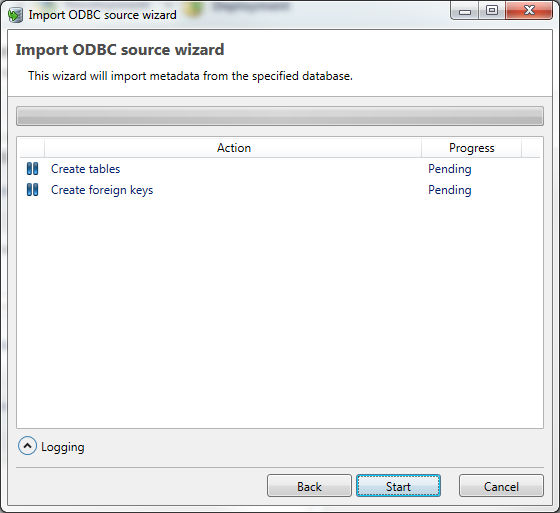
In the last screen of the wizard the Metadata import can be started and monitored. The center part of the screen shows the progress of the import process. Initially, the status for every step is Pending. While the import is executing, logging is generated for every step in case of any errors or warnings. In order to view this logging, the user can press the Logging fold-out button in the bottom left corner of this screen.
Click on Start to execute the import the Metadata into DATPROF Subset. When the import wizard is finished, the start button will change into Finish, which can then be pressed to close the import wizard.
Importing Metadata using a DME file
Aside from importing the Metadata directly from the database, the Metadata can also imported from a flat file format called DME (Data Model Export).
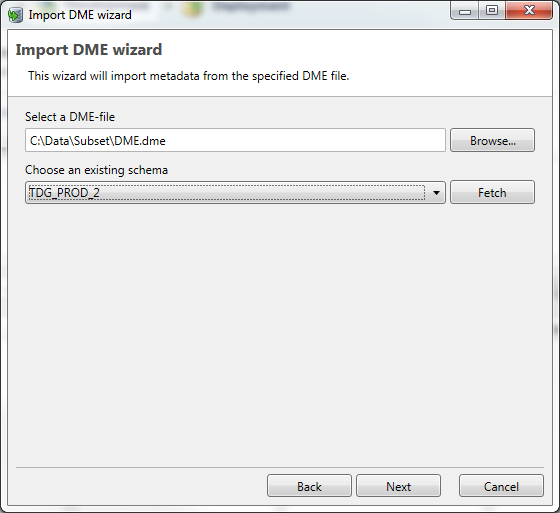
This method might be useful whenever some Foreign Keys are not defined as constraints in the Source database but are manually added In DATPROF Subset or Privacy and exported. You can import Metadata from DME files using the menu option Project -> Import and Synchronize -> Import Metadata from DME-file...
The data from a DME file must be linked to a schema in the Metadata, which you can do by selecting the schema this DME-file’s data belongs to from the drop-down box in the import overview.
Choose a DME-file and select a schema from the drop-down list. Press the fetch button to show the available schema’s in the Target database. The imported Metadata will be linked to this schema.
Once this is done, press Next to proceed. After this step, the following steps should be identical to those described earlier in the Import metadata chapter.
Synchronize Metadata
It is possible that after a while the imported Metadata is no longer in sync with what exists in the Source database. DATPROF Subset provides an easy way to check for differences between the Metadata and the data model of the Source database. and synchronize the Metadata.
The check is done for Tables, Primary Keys and Foreign Keys and will show the following statuses for items:
New
Removed
Changed
Source connection
The synchronization can be based on an ODBC connection, a database, or a DME file.
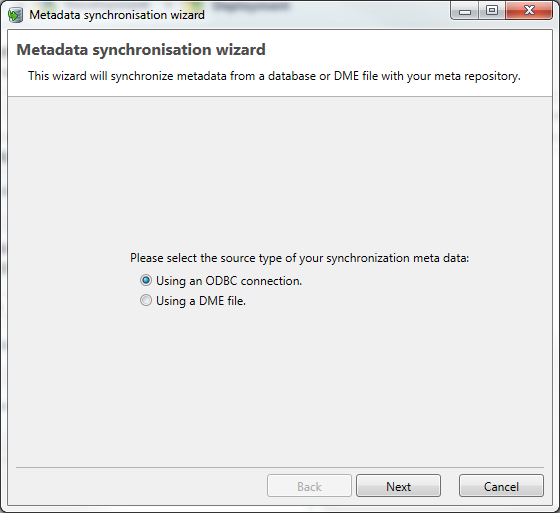
Select "Using a DME file" or "Using an ODBC connection" and click Next to proceed.
When using an ODBC connection
When you choose to synchronize using an ODBC source, you can enter a new connection or select a previously saved connection.
Usually the Source connection is chosen to synchronize with.
Click Next to proceed.
When using a DME file
When selecting the DME option, you can select the DME flat file and choose a schema to link the imported meta data.

Click Next to proceed.
Changes overview
The overview shows all changes between the Source database and the imported Metadata.
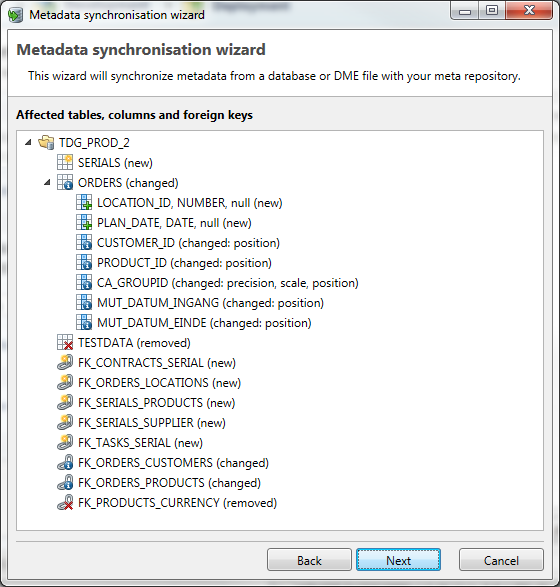
When you press Next, you will get a maximum of six screens in which you can select the changes to import.
The following screens can be part of the wizard.
New tables in the Source database
Updated tables in the Source database
Tables that are not present (anymore) in the Source database
New foreign keys in the Source database
Updated foreign keys in the Source database
Foreign keys that are not present (anymore) in the Source database.
Synchronize
The last part of the wizard will show all changes that are selected.
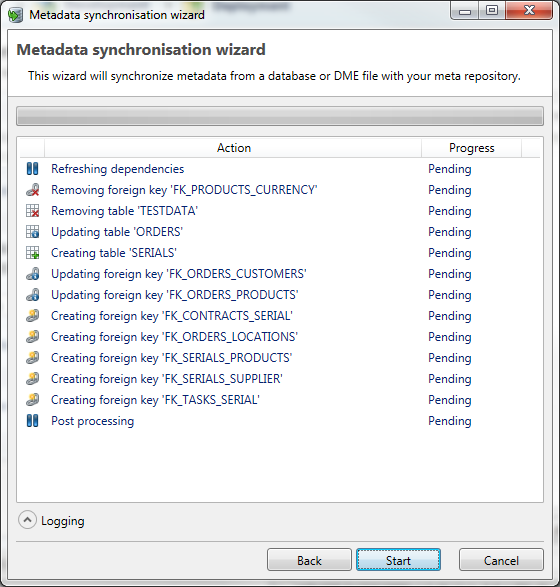
Press the Start button to start the synchronization of the Metadata.
During synchronization, the progress can be followed in the following screen.
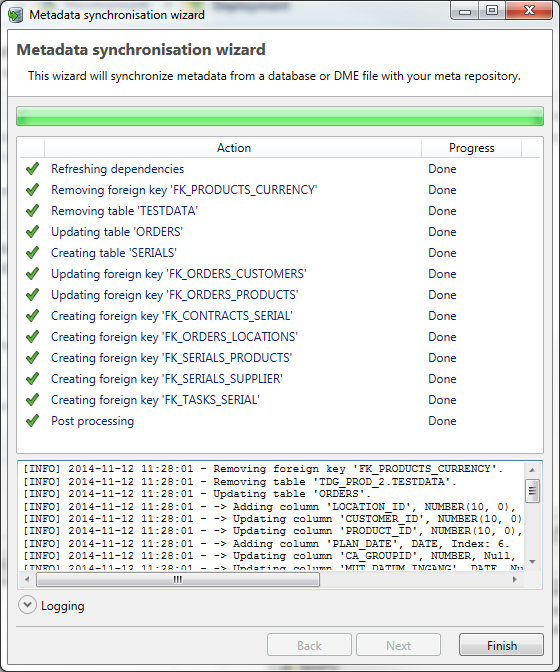
Click Finish to close the wizard.
Schema mapping
After importing Metadata the Schema mapping is visible at the right side of the screen. The schema mapping maps the imported Source schema to a schema in the Target database. This is to ensure the subsetted data is inserted into the correct schema in the Target database.
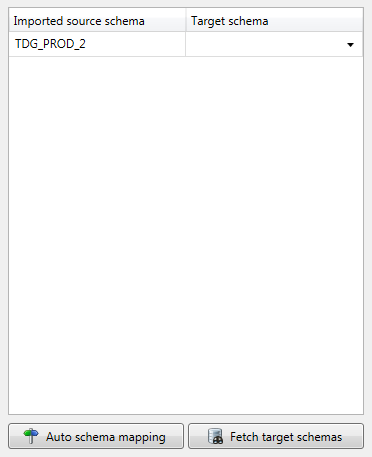
If the Metadata is not yet imported, this part of the screen is empty. After importing the Metadata the column Imported Source schema shows the available schema’s. The column Target schema will show a drop-down box filled with valid Target schema’s to choose from. Double clicking the empty Target schema will fetch the available schemas from the Target connection, after which the user can select the matching schema to be used during deployment.
The button Fetch target schemas will also fetch the available schemas from the Target connection.
The button Auto schema mapping starts a search for identical schema names in the Target connection as available in the Source schema. When there is a match, this schema is used for the Target schema.
The name of the Source schema is editable. When imported tables are moved from one schema in the Source database to another, users can edit the schema name to access the imported tables. There is no need for a new project or a new import. Use this feature with care. In normal situations there is no need to edit the imported Source schema. The schema mapping is optional for development but mandatory for deployment. Just before deployment, DATPROF Subset will check if the schema mapping is entered correctly.
Make sure the Target schema and the Source schema are not physically the same schema, as this will cause issues, and make runs fail.