Project Settings
In this chapter the configuration settings of the Project settings screen will be explained.
The left part of the screen is used to define three important parts of a project:
- Selecting the connection to the Source database.
- Selecting the connection to the Target database.
- Importing the datamodel from the Source database into DATPROF Subset Metadata.
In addition there are some other useful options:
- Metadata from existing projects can be synchronized with the Source database.
- The selected connections can be tested.
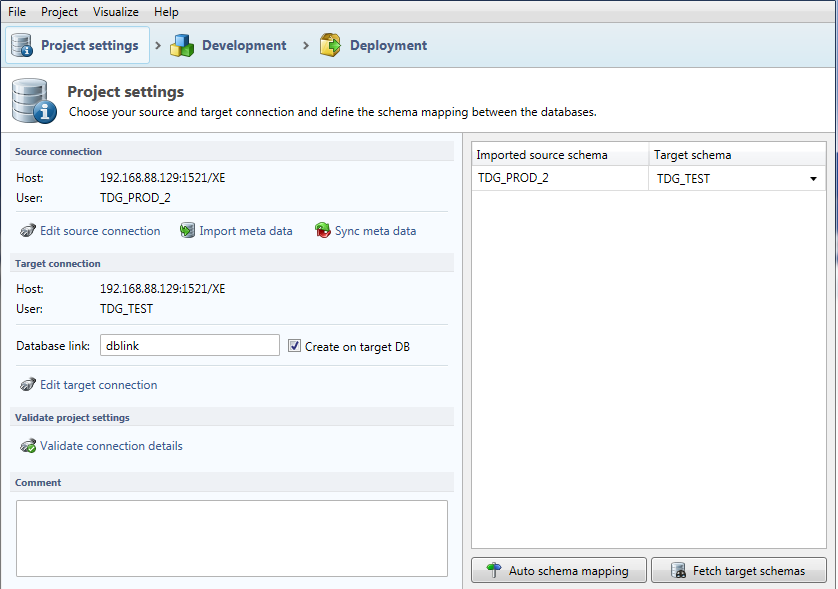
Source database and Target database
Every project starts with defining the connections of the databases.
The Source database is used for two things.
- Importing the data model before development
- Fetching the data during deployment.
For the Source database only Select permissions are required.
The Target database is used for the following purposes.
- Counting tables in the Source database will always be executed from the Target database.
An exception to this lies with projects using DB2 for Linux, Unix Windows (LUW), which will execute the counting directly on the Source database. - During deployment the Subset will be saved in the Source database.
You need Create and Write permissions in the Target database.
You need Read permissions in the Source database for the user in the Target database.
Users can enter and select connections in the Connection Editor. Use the buttons Edit Source connection and Edit target connection.
The left part of the Connection editor is used to present earlier saved connections. When using DATPROF Subset for the first time, this part will be empty.
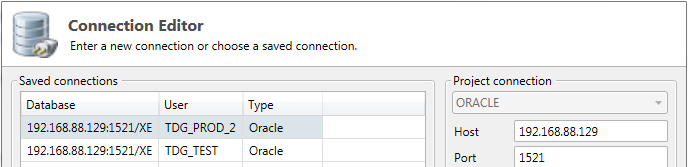
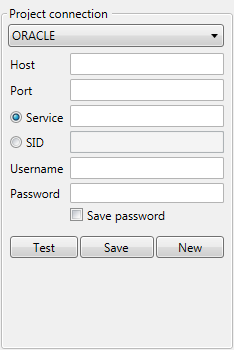
On the right part of the screen new connections can be entered and tested. There are several types of databases supported. (Oracle, Microsoft and two flavours of DB2). Each database has their own parameters.

Ask a Database Administrator for the information of the required databases. Click on the Test button to check the connection. Use the Save button to save the connection for later use.
Oracle
Connection Type: ORACLE.
Host: Hostname or IP-address of the database server.
Port: TCP Port
SID / Service: Unique database identification.
Schema: Schema name.
Oracle database link
When using a Oracle the database DATPROF Subset requires an Oracle Database link. This Database Link must be entered in the Project Settings screen. The field is accessible under the Target Connection.
During Deployment DATPROF Subset will use the Target database to execute the queries to collect the data from the Source database using this Database link.
The user that is used for the Target database must have proper permissions to create a database link. If that is not the case a database administrator must create the database link and the name of the database link should be entered.
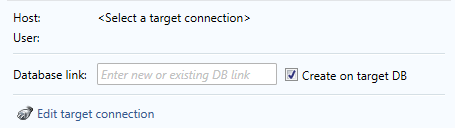
Two things are required:
- The name: The name of the new or existing Database link.
- The choice to create the Database link during Deployment or not. This is default. If the Database link already exists the checkbox must be unchecked.
![]() If the deployment of DATPROF Subset fails and the “Create on target DB” checkbox is checked, the database link will not be deleted. Executing the Subset process again will fail because it cannot create the already existing database link. Drop the database link manually or uncheck the checkbox next to the Database link name.
If the deployment of DATPROF Subset fails and the “Create on target DB” checkbox is checked, the database link will not be deleted. Executing the Subset process again will fail because it cannot create the already existing database link. Drop the database link manually or uncheck the checkbox next to the Database link name.
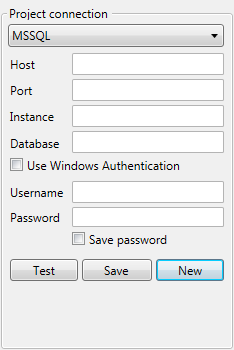
Microsoft SQL Server
- Connection Type: MSSQL.
- Host: Hostname or IP-address of the database server.
- Port: Port of the SQL Server database.
By default this is 1433.
When empty, the default port will be used. - Instance: If a named instance is used, fill in this field with the name of the instance. This property is optional, then the default instance on the host is used.
- Database: Name of the database
- Use Windows Authentication: Use your windows authentication to log on to the SQL Server database. Using the Windows authentication for both Source and Target connection can cause a “double hop” .
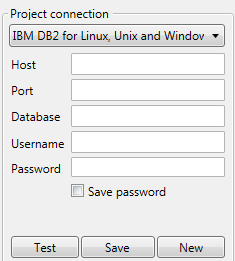
DB2 for Linux, Unix, Windows (LUW)
- Connection Type: IBM DB2 for Linux, Unix and Windows.
- Host: Hostname or IP-address of the database server.
- Port: Port of the database server.
- Database: Name of the database.
DB2 Server name
When DB2 for LUW is chosen as the type of connection, Subset uses a DRDA connection that is created by a database administrator. A “Server” is created with a DB2 Server name. You can read more about this topic in the Installation chapter of this manual.
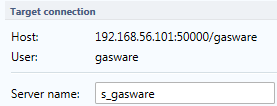
The server name must be entered in the project settings screen below the Target connection.
DB2 for iSeries
DATPROF Subset for DB2 for iSeries (or in short for i) works different compared to the other database types. DB2 for iSeries uses the same database for both Source and Target. Using the schema mapping, the Subset will be created in a different schema than the source tables.
There is no Target connection or “Server name” to be entered when using IBM DB2 for i
- Connection Type: IBM DB2 for i
- Host: Hostname of IP-address of the database server.
- Database: Name of the database.
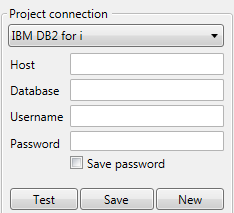
The checkbox Save password will save the password encrypted so you can easily pick the connection from the saved connection list. If you don’t check the save password checkbox you can only use the connection within your current project.
The Test button will check the entered connection details.
The Save button will save the connection so it can easily picked from the saved connection list when building other templates.
All connections will be saved in the file “Subset_connections.lst” in the application data folder of the Subset Installation. <Windows User>\AppData\Local\DATPROF\
![]() A Subset project always consists of two data connections of the same Database type. Creating a Subset from Oracle to SQL Server or otherwise is not part of the functionality.
A Subset project always consists of two data connections of the same Database type. Creating a Subset from Oracle to SQL Server or otherwise is not part of the functionality.
PostgreSQL
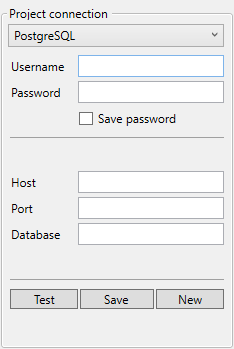
- Username: Database user
- Password: Password for database user
- Host: hostname or IP adress
- Port: Portnumber of the database server
- Database: Name of the database to obtain metadata from.
MySQL / MariaDB
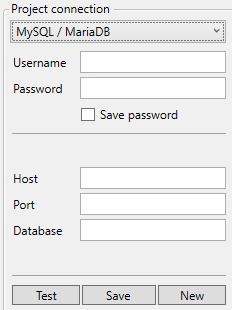
- Username: Database user
- Password: Password for database user
- Host: Hostname or IP adress
- Port: Port number of the database server
- Database: Name of the database to obtain metadata from
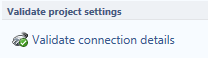
Validate Project settings
The Project Settings selections can be validated by using the button Validate connection details.
Different checks are executed for the different types of databases.
Microsoft Sql Server
- Source Connection
- Target Connection
Oracle
- Source Connection
- Target Connection
- Database link
DB2 for Linux, Unix and Windows
- Source Connection
- Target Connection
- Server name*
*The Server name can only be validated if the Metadata is imported and the Target Schema is selected.
DB2 for i
- Source Connection
Import Metadata
After the Source connection is selected, the data model of that database can be imported. The Metadata of this data model is saved in the project file and will be the starting point for further development.
The import process consists of three steps.
- Select which tables you want to import
- Select which foreign keys you want to import
- Import the data model and foreign keys
Use the Import meta data button or select menu option Project -> Import and synchronize -> Import meta data wizard…
A new wizard window will open showing the tables of the Source database.
![]() Views are ignored in the import Metadata wizard.
Views are ignored in the import Metadata wizard.
Select tables to import
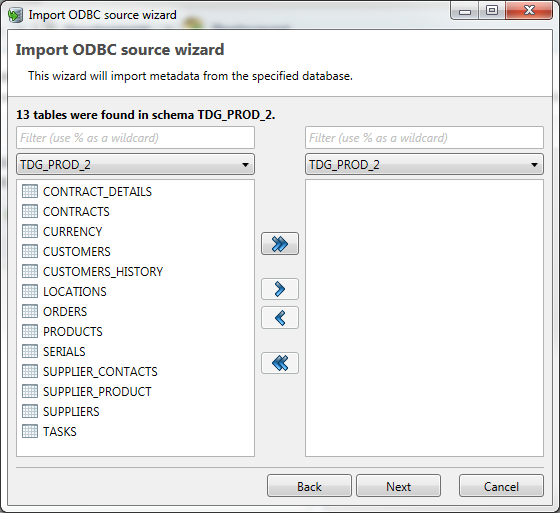
Users can select the schema in the drop-downbox from which the tables must be imported.
The user can import tables across multiple schemas.
On the left hand side all the available tables are visible.
The right hand side will show all the tables selected to be imported.
Tables can be selected using CTRL or SHIFT in combination with the arrow keys or the left mouse button.
Using the buttons > and < will only move selected tables to the opposite pane.
Using the buttons >> and << will move all tables to the opposite pane.
Users can easily filter out specific tables by defining a filter using the box the lists. The percentage sign (%) can be used as wildcard. Then the buttons >> and << will move all the filtered tables.
Click next to proceed to the Foreign Key section of the wizard.
Select Foreign Keys
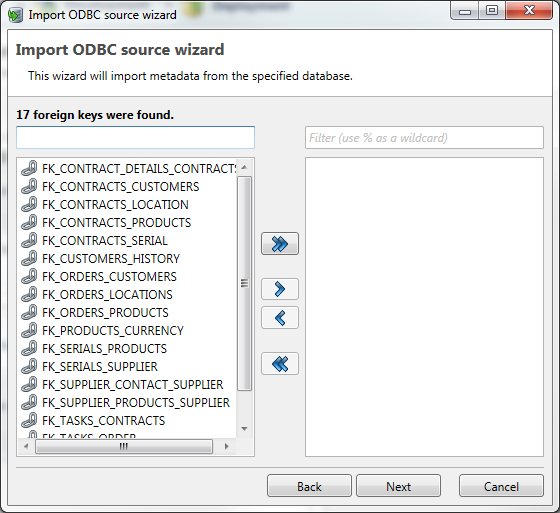
This part of wizard can be used to select Foreign Keys to import. The function of this screen is likewise the Table selection screen but no schema selection is available.
The list of available Foreign Keys is derived from the previous selected tables or the tables already imported. Choosing Foreign Keys is optional.
Press Next to go to the last screen or Back to return to the Table selection screen.
Import Metadata
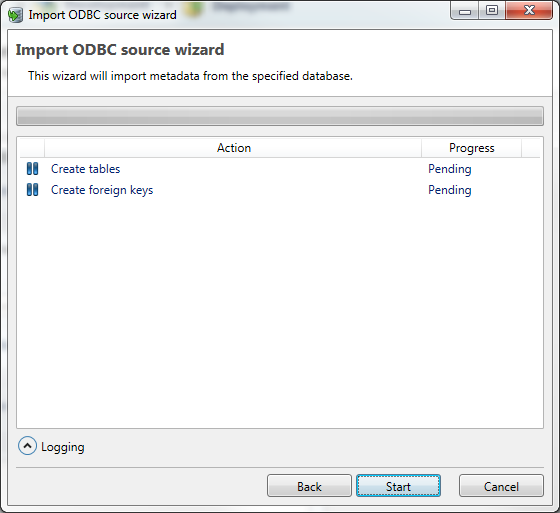
In the last screen of the wizard the Metadata import will actually be imported.
The center part of the screen shows the progress of the import process. Only one or two rows are visible and show the status of the import. Initially the status is Pending.
Click on Logging to expand the screen to view logging messages during importing.
Click on Start to execute the import the Metadata into DATPROF Subset.
When the import wizard is finished, the start button will change into Finish.
Press Finish to close the wizard.
Importing Metadata using a DME file
Besides importing the Metadata directly from the database, the Metadata can also imported from a flat file format called DME (Data Model Export).
This method might be useful whenever some Foreign Keys are not defined as constraints in the Source database but are manually added In DATPROF Subset or Privacy and exported. You can import Metadata from DME files using the menu option Project -> Import and Synchronize -> Import Metadata from DME-file...
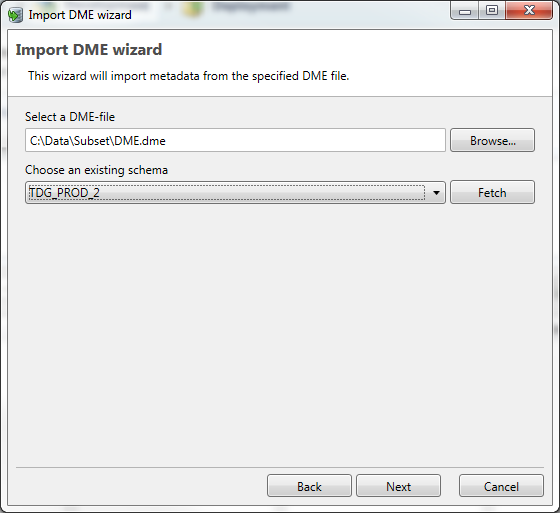
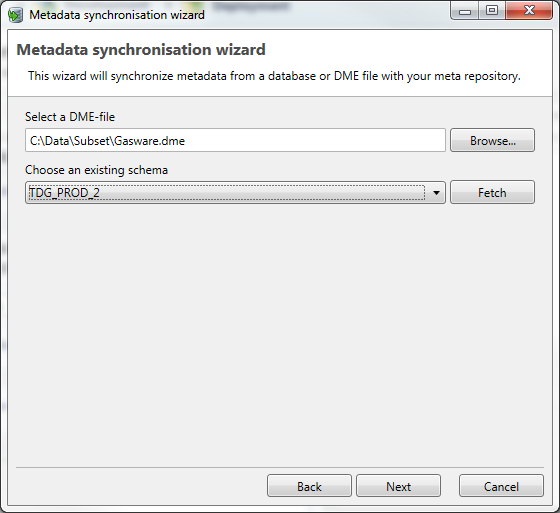
The data from a DME file must be linked to a schema in the Metadata. Therefor it is required to select a Source database and select a schema to store the imported data from the DME file.
Select from the menu: Project -> Import and Synchronize -> Import Metadata from DME-file...
Choose a DME-file and select a schema from the dropdown list. Press the fetch button to show the available schema’s in the Target database. The imported Metadata will be linked to this schema.
Press Next to proceed this wizard. The subsequent screens are the same as the already described import Metadata wizard.
Synchronize Metadata
It is possible that after a while the imported Metadata is not in sync with the Source database. DATPROF Subset provides an easy way to check for differences between the Metadata and the datamodel of the Source database. and synchronize the Metadata.
The check is done for Tables, Primary Keys and Foreign Keys and will show:
- New
- Removed
- Changed
Select the Source
The synchronization can be based on an ODBC connection, a database, or a DME file.

Check the radio button and click Next to proceed.
When using an ODBC connection
When you choose to synchronize using an ODBC source, you can enter a new connection or select a previously saved connection.
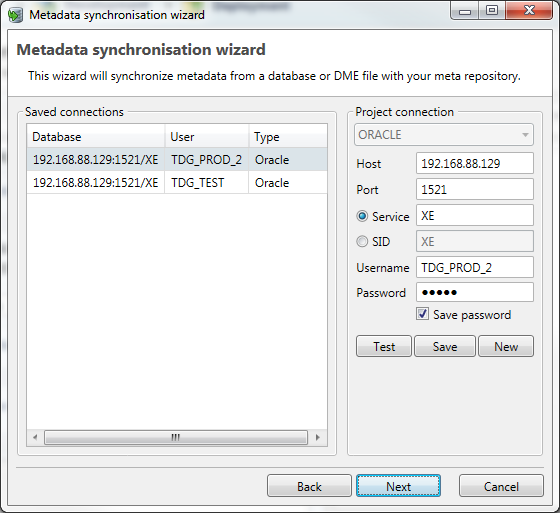
Usually the Source connection is chosen to synchronize with.
Click Next to proceed.
When using a DME file
When selecting the DME option, you can select the DME flat file and choose a schema to link the imported meta data.
Click Next to proceed.
Changes overview
The overview shows all changes between the Source database and the imported Metadata.
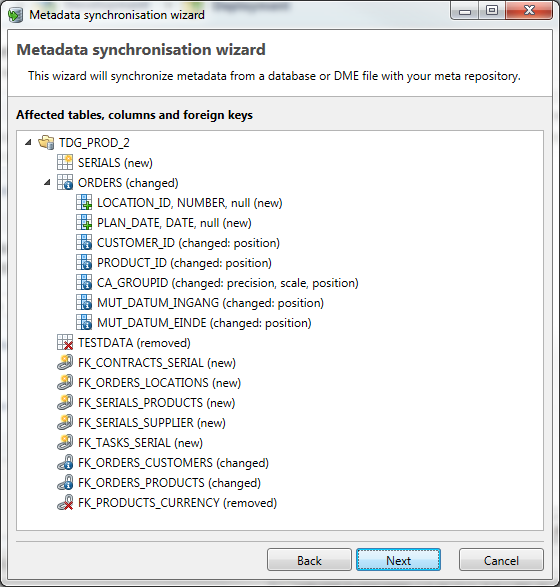
When you press Next, you will get a maximum of six screens in which you can select the changes to import.
The following screens can be part of the wizard.
- New tables in the Source database
- Updated tables in the Source database
- Tables that are not present (anymore) in the Source database
- New foreign keys in the Source database
- Updated foreign keys in the Source database
- Foreign keys that are not present (anymore) in the Source database.
Synchronize
The last part of the wizard will show all changes that are selected.
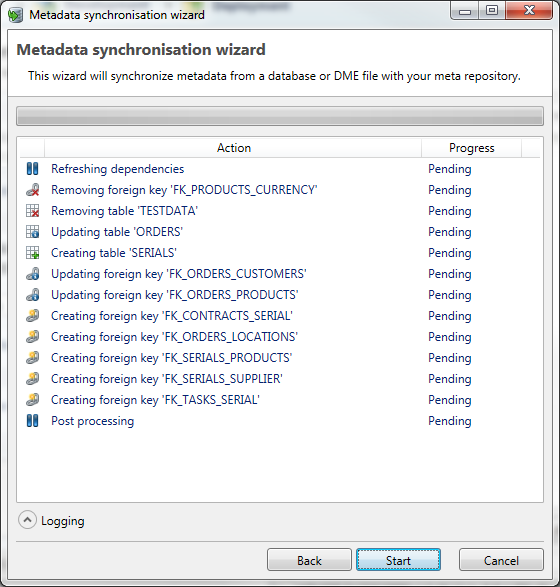
Press the Start button to start the synchronization of the Metadata.
During synchronization, the progress can be followed in this screen.
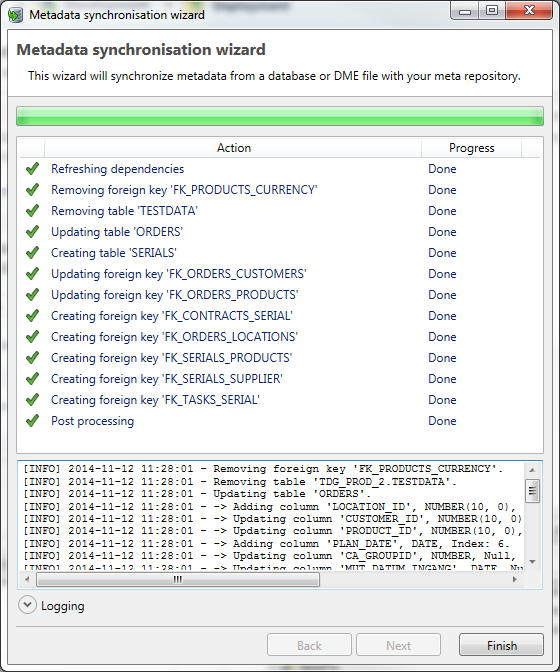
Click Finish to close the wizard.
Schema mapping
After importing Metadata the Schema mapping is visible at the right side of the screen. The schema mapping maps the imported Source schema to a schema in the Target database. This is to ensure the subsetted data is inserted into the correct schema in the Target database.
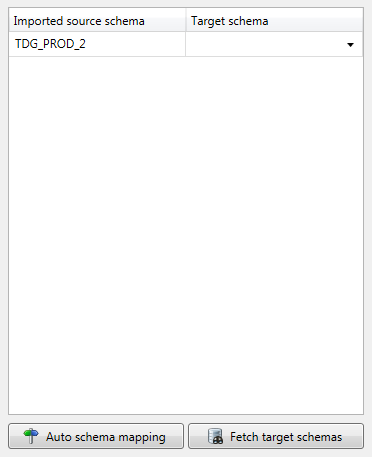
If the Metadata is not yet imported, this part of the screen is empty. After importing the Metadata the column Imported Source schema shows the available schema’s. The column Target schema will show a drop-downbox filled with valid Target schema’s to choose from.
Double clicking the empty Target schema will fetch the available schemas from the Target connection. Select the schema to use during deployment.
The button Fetch target schemas will also fetch the available schemas from the Target connection.
The button Auto schema mapping starts a search for identical schema names in the Target connection as available in the Source schema. When there is a match, this schema is used for the Target schema.
The name of the Source schema is editable. When imported tables are moved from one schema in the Source database to another, users can edit the schema name to access the imported tables. There is no need for a new project or a new import.
Use this feature with care. In normal situations there is no need to edit the imported Source schema.
The schema mapping is optional for development but mandatory for deployment. Just before deployment, DATPROF Subset will check if the schema mapping is entered correctly.
![]() Make sure the Target schema and the Source schema are not physically the same schema.
Make sure the Target schema and the Source schema are not physically the same schema.