XML Files
Runtime masks fields in XML files using XPath 3.1 expressions to locate elements or attributes to transform. XPath expressions are provided relative to the context element and can target any depth in the XML structure. This approach allows flexible and precise masking for complex XML hierarchies.
Creating an Application
To configure an application, click the "Install Application" button. This will open a new page where you can either select an existing application or create one from scratch. Assuming this is your first file masking application, click the "Create a New Application" button to open the configuration page:
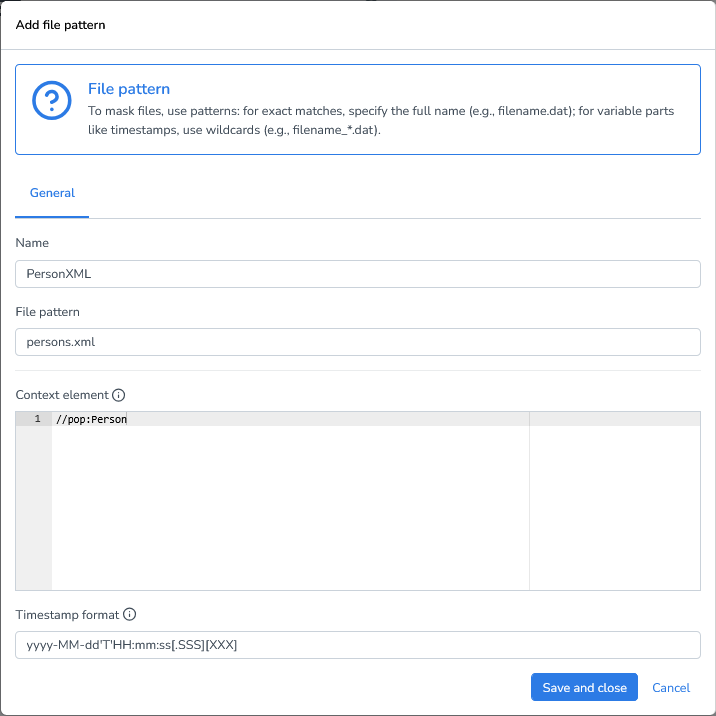
File Pattern
When working with XML files, you can configure the following options to ensure proper parsing and interpretation:
Exact file names: Use the full file name if it’s always the same.
Example: CUSTOMERS_10k.xmlWildcard patterns: Use wildcards to match files with dynamic elements, such as timestamps, sequence numbers, or environment identifiers.
Example: CUSTOMERS_*.xmlContext Element: In XML, there is no inherent concept of rows like in databases or CSV files. To logically split your XML file into rows, each representing a single record, you must define a context element using an XPath expression. This tells the engine which node should be treated as one logical unit for processing.
For example, in the XML structure below:<pop:PopulationRegistry><pop:Person>...</pop:Person><pop:Person>...</pop:Person></pop:PopulationRegistry>
You can specify the context element as either://pop:Person, meaning “every<pop:Person>element is one row”Or the more explicit
/pop:PopulationRegistry/pop:Person
This context element is crucial because all masking functions applied to the file will be evaluated relative to this node.
Timestamp Format: Define the timestamp format for parsing timestamp strings with datetime masking functions.
Default:
yyyy-MM-dd'T'HH:mm:ss[.SSS][XXX]
Adding Masking Functions
Let’s start with a simple case where we want to replace all last names inside <pop:LastName> elements.
We’ll use this XML file as a demo:
<?xml version="1.0" encoding="UTF-8"?>
<?xml-stylesheet type="text/xsl" href="person-style.xsl"?>
<!-- Complex XML Example: Fictive Population Registry -->
<pop:PopulationRegistry
xmlns:pop="http://example.org/population"
xmlns:xsi="http://www.w3.org/2001/XMLSchema-instance"
xsi:schemaLocation="http://example.org/population population.xsd"
version="2.1">
<pop:Person id="93601">
<pop:Name>
<pop:FirstName>Delmer</pop:FirstName>
<pop:MiddleName>
<![CDATA[Chris]]>
</pop:MiddleName>
<pop:LastName>Fenner</pop:LastName>
</pop:Name>
<pop:BirthInfo>
<pop:DateOfBirth>2005-02-11</pop:DateOfBirth>
<pop:PlaceOfBirth>New York</pop:PlaceOfBirth>
<pop:Country code="USA">United States</pop:Country>
<pop:Gender>M</pop:Gender>
</pop:BirthInfo>
<pop:ContactInfo>
<pop:Email type="personal">DFenner@live.com</pop:Email>
<pop:Email type="personal">Delmer.Fenner@hotmail.com</pop:Email>
<pop:Email type="work">Delmer.Fenner@shell.com</pop:Email>
<pop:Phone type="mobile">+44-7911-123456</pop:Phone>
</pop:ContactInfo>
<pop:Documents>
<pop:Passport SSN="437-02-2223" issuedBy="USA" issueDate="2010-05-20" expiryDate="2025-05-20"/>
</pop:Documents>
<pop:Notes>
<!-- Special notes regarding the person -->
<pop:Note xml:lang="en">Subject relocated to "Canada" in 2019.</pop:Note>
<pop:Note xml:lang="fr">
<![CDATA[Réside à Montréal depuis 2019.]]>
</pop:Note>
</pop:Notes>
<pop:Salary>45393</pop:Salary>
</pop:Person>
<pop:Person id="93602">
<pop:Name>
<pop:FirstName>Irvin</pop:FirstName>
<pop:LastName>Mcgrew</pop:LastName>
</pop:Name>
<pop:BirthInfo>
<pop:DateOfBirth>1948-08-29</pop:DateOfBirth>
<pop:PlaceOfBirth>Berlin</pop:PlaceOfBirth>
<pop:Country code="DE">Germany</pop:Country>
<pop:Gender>M</pop:Gender>
</pop:BirthInfo>
<pop:MaritalStatus status="married" since="2002-06-15"/>
<pop:Employment>
<pop:Occupation>Systems Analyst</pop:Occupation>
<pop:Employer name="Capital One Financial Corp." id="E1003"/>
</pop:Employment>
<pop:Documents>
<pop:Passport SSN="26-98-1475" expiryDate="2028-05-25" issueDate="2011-05-25" issuedBy="USA"/>
</pop:Documents>
<pop:Salary>45897</pop:Salary>
</pop:Person>
<pop:Person id="93605">
<pop:Name>
<pop:FirstName>Bonnie</pop:FirstName>
<pop:LastName>Wiese</pop:LastName>
</pop:Name>
<pop:BirthInfo>
<pop:DateOfBirth>2000-12-25</pop:DateOfBirth>
<pop:PlaceOfBirth>Amsterdam</pop:PlaceOfBirth>
<pop:Country code="NL">Netherlands</pop:Country>
<pop:Gender>F</pop:Gender>
</pop:BirthInfo>
<pop:MaritalStatus status="married" since="2002-06-15"/>
<pop:Employment>
<pop:Occupation>Lieutenant</pop:Occupation>
<pop:Employer name="Marine" id="E1003"/>
</pop:Employment>
<pop:Documents>
<pop:Passport SSN="523-54-3453" issuedBy="USA" issueDate="2011-05-25" expiryDate="2028-05-25"/>
</pop:Documents>
<pop:Salary>58957</pop:Salary>
</pop:Person>
<pop:TotalSalary>150247</pop:TotalSalary>
</pop:PopulationRegistry>Click Add Masking Function.
Select the function Last name generator.
Define the XPath expression to target the element:
.//pop:LastName→ Relative path from the context (<pop:Person>). This finds<pop:LastName>even if nested inside<pop:Name>.Alternatively:
./pop:Name/pop:LastName. This is more declarative but requires you to type the full hierarchy.

Because the context is <pop:Person>, you can use relative XPath starting with ..
Conditional Masking
Elements
Sometimes you only want to mask values under certain conditions.
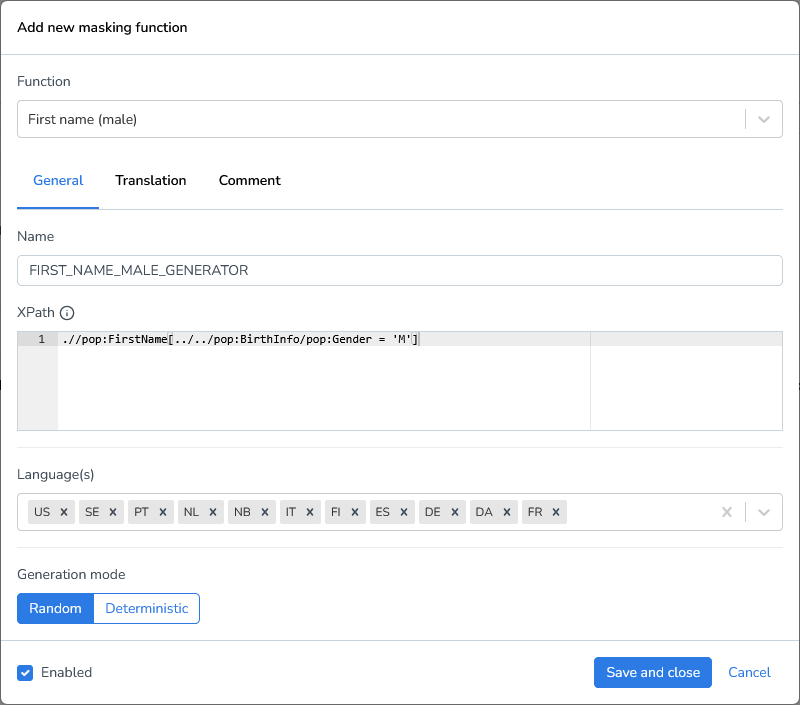
Example: Generate new first names for males only
Add a new masking function.
Select the function First name (male).
Define the XPath:
.//pop:FirstName[../../pop:BirthInfo/pop:Gender = 'M'].//pop:FirstName→ finds all first names.[condition]→ only selects those that match the condition.../../→ navigates up two levels (from<pop:FirstName>to<pop:Person>)./pop:BirthInfo/pop:Gender→ drills down into<Gender>.= 'M'→ applies only when gender is male.
This way, male first names will be replaced with synthetic male names, while female first names remain unchanged.
You can easily clone this function and adjust it for = 'F' to handle female first names.
Attributes
You can also apply conditions using attributes.
Example: Mask Only Personal Email Addresses
Add a Custom expression masking function
Use the XPath expression to find Email where type = ‘personal’
.//pop:Email[@type = 'personal']@type→ means “look at the attribute namedtype”.This will filter
<pop:Email>elements wheretype="personal".
If you wanted to filter on attribute on a different level for example the id attribute in <pop:Person id="93601"> , you could use:
.//pop:Email[../../@id = '93601']Custom Expressions
In some cases, you want to generate a new value based on multiple other values.
Example: Constructing an email address from first and last name
concat(substring(.//pop:FirstName, 1, 1), '.', .//pop:LastName, '@datprof.com')Explanation:
The concat function combines multiple elements into a single string. In this example, it takes four arguments to construct an email address:
substring(.//pop:FirstName, 1, 1)→ extracts the first letter of the first name.'.'→ inserts a literal dot..//pop:LastName→ appends the last name.'@datprof.com'→ appends the domain.

Result: For the name “Delmer Fenner”, the output is: D.Fenner@datprof.com
Problem: This example uses the original names. To generate emails from masked names, we need dependencies.
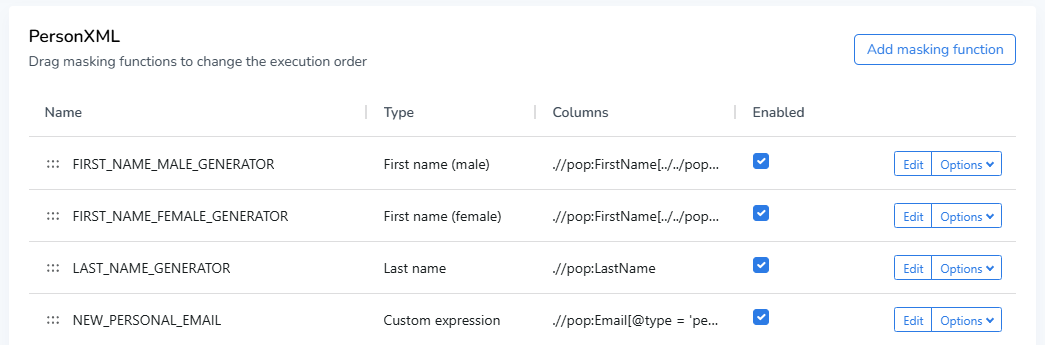
Dependencies
The File Masking engine allows you to determine the execution order between functions.
Example:
Mask first names.
Mask last names.
Generate a new email address based on these masked names.
Because the email function is defined after the other two, it automatically uses the masked values.
So
Delmer Fenner→Gerry Jagger.Email:
G.Jagger@datprof.com.
You can reorder dependencies by dragging functions with the drag indicator before the function name to change the execution order.
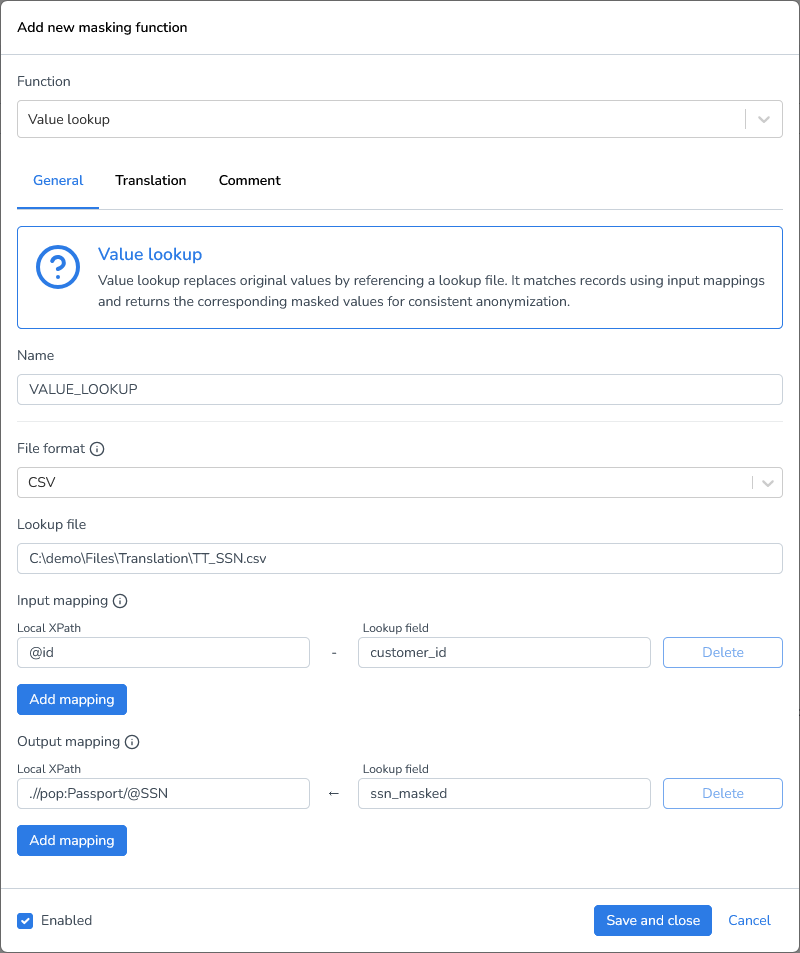
Value Lookup
Sometimes you want to replace values with predefined translations from a file (CSV, Parquet, JSONL).
Example: Replace SSNs using TT_SSN.csv
customer_id,ssn_masked
93601,"11-22-3333"
93602,"22-33-4444"
93605,"33-33-5555"
Configuration steps:
XPath: point to the SSN attribute in
<pop:Passport>(e.g.@SSN) using.//pop:Passport/@SSN.Define file format and location of the lookup file(CSV in this case).
Input mapping: link/join the XML in the CSV using the
@idin<pop:Person id=”93601”>linked to thecustomer_idcolumn in the CSV file. In this case we can directly use@idbecause the context is already//pop.PersonOutput mapping: choose
ssn_maskedto replace the SSN value.
Important: The lookup file must be accessible to the DATPROF Runtime application.
Local/Network files: use full (absolute) file paths to ensure the system can correctly locate the file, regardless of the current working directory.
Example:C:\Data\Exports\file.csv\\Server\Shared\Backups\file.csv
Azure/AWS: Use relative paths within the configured storage container, bucket, or root directory. The base location is defined in the cloud storage configuration, so only the path relative to that root is required.
Example:translation/file.csvbackups/2026/file.csv
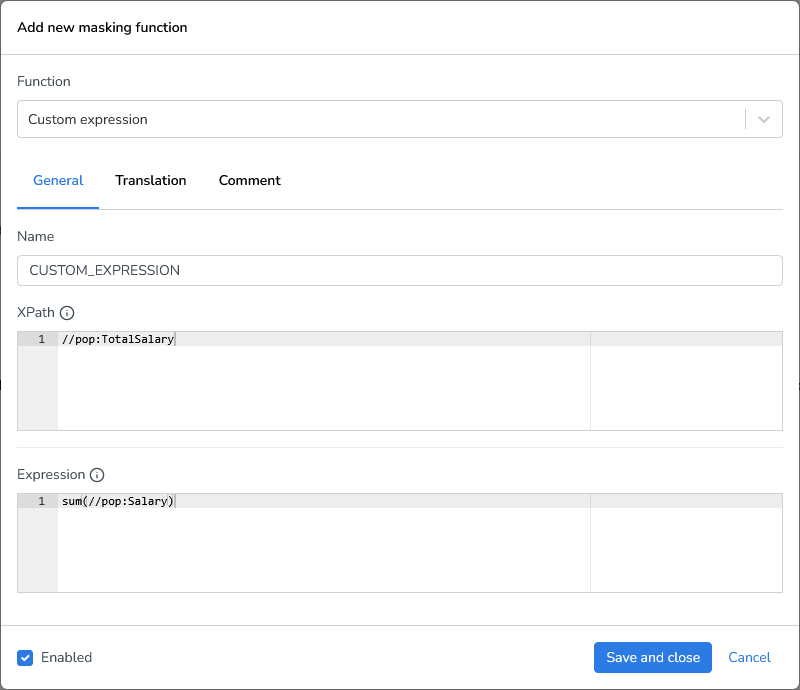
Calculating Totals
When masking data, for example a salary, it can be required to recalculate the sum. In the example file below each person has its own salary and at the bottom we have total salary.
Example: Mask salaries and recalculate total salary
Add a Random whole number masking function
Use the XPath expression to find Salary:
.//pop:SalaryEnter a minimum and maximum between 40000 and 50000
Save and close the function

Add a Custom expression masking function
Use the XPath expression to find pop:TotalSalary (The relative . (dot) is not used, because TotalSalary is on higher level than the context node pop:Person
//pop:TotalSalaryFor the Expression use the following XPath to sum all
pop:Salaryelements.sum(//pop:Salary)