Using Postman to design API requests
Postman is an API platform for building and using APIs. Postman simplifies each step of the API lifecycle and streamlines collaboration so you can create better APIs—faster.
Automating the Runtime experience through API requests can be a valuable asset for end-users and administrators alike. Whether it’s a simple script to start off a run or a complex integration with proprietary interfaces which allow you to access all your tools in one location, our API can do it all.
Though APIs are designed to be easy to use, the opposite is often true. Figuring out syntactically correct requests, testing scripts, and digging through documentation manually in search of that one command you need discourages most users from even trying! Luckily, Postman is an accessible solution that can help users design scripts faster, with less hassle, and make the design phase an overall more enjoyable experience. In this chapter of the documentation we’ll be using Postman to build and test requests in order to familiarize end-users with its usage.
Once you’ve configured your API requests in Postman, the application offers the ability to export them as other formats (such as Curl, Powershell, etc.). In this chapter of the documentation we’ll be using Postman to go through the steps needed to build and execute a run. These are, in the following order:
- Creating a Group (project)
- Adding an environment to the group
- Uploading an application as a ZIP package (either Subset or Privacy)
- Executing a run
In this chapter we won’t be going over every single possible command. The contents of this page are intended to get users familiar with the workflow of Postman when combined with our existing API requirements and style conventions.
As such, you might not find a specific function you’re used to seeing in your usual Runtime workflow being handled here. However, once you’ve mastered the following steps you should be well equipped to follow the documentation and design more complex requests at your own pace.
Requirements
In order to start developing API scripts for Runtime, you’ll need the following:
- An API key, generated in the API tokens menu in Runtime.
- An installation of Postman, using the desktop client.
- An existing Runtime installation which is currently running.
- A basic understanding of how to work with JSON, and scripting tools like Powershell or Curl.
- The API Documentation (handled in the next chapter!)
Using the documentation
Our API has automatically generated documentation, made with Redoc. In order to access this, navigate to your Runtime interface. In the bottom-left corner you should see the API Docs button. After landing on this page, you’ll see all of the possible commands, and their type.
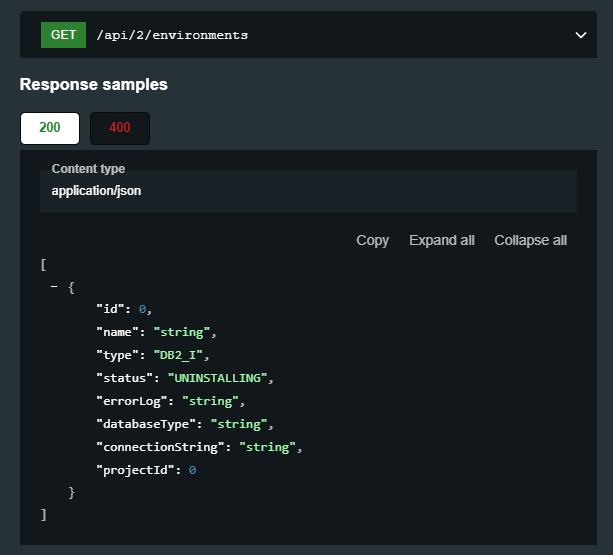
The following image is the right-hand side specification of the command to get information about your installed environments. This is a template, and you can see at the top the link extension you’ll have to direct your call towards. This is an affix to your existing runtime URL.
If you’ve hosted your Runtime environment on localhost, the following link would look like this:
if you use the web application, sending a call to localhost will fail, therefore you will need to use the desktop client or download the desktop agent so you can keep using the web application.
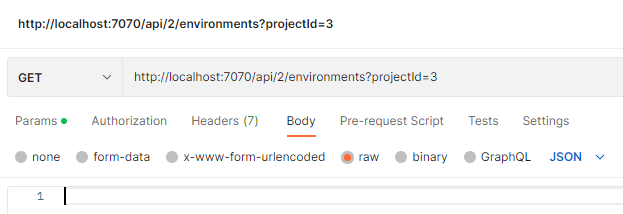
In this example, we know we have to send a GET query to http://localhost:7070/api/2/environments , and from the information on the left (image below) we can see that there are required parameters. The JSON string shown in this image is the template for the data this command will return.

You can supply one or multiple parameters by adding ?<parameter_name>=<parameter_value> to the target of our call. If I want to retrieve the environment id, I’ll need to know the projectId, which can be found using another API GET command.
Our resulting GET target is the following:
Understanding Responses
When sending a script to the API, the API has a number of response codes. These are always displayed in a list under every possible command in the API documentation.
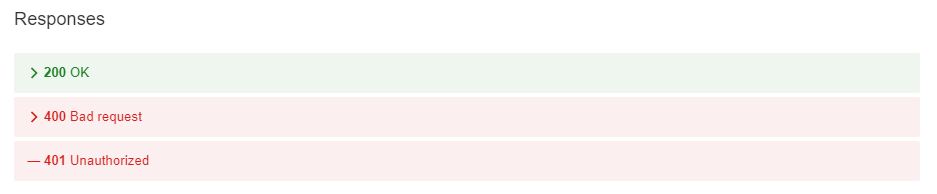
Upon clicking on these response tabs, you can see what the information of the response message is, in order to gain more insight into resolving the underlying issue.
A 401 - Unauthorized error always means you either did not include your API key as a header in your request, or that your API key is incorrect. Make sure to always include it in your scripts!
Using the right data types
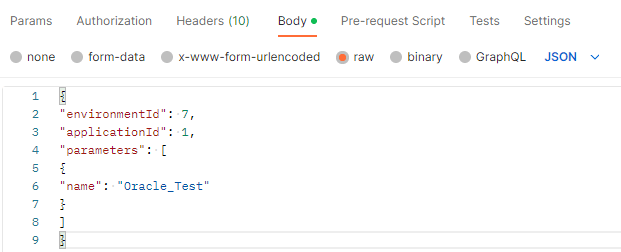
Postman has the ability to format a request in multiple different ways. This is useful, but can lead to a few errors. In general, Runtime’s API accepts requests formatted as raw->JSON. A correctly formatted JSON is configured as in the image below.
Importing the OpenAPI specification into Postman
It’s possible to import all the available request templates into Postman. To do this, navigate to the API documentation and scroll to the very top of the landing page. Here, you’ll see the following link.
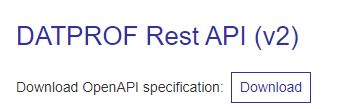
After downloading this JSON file, navigate to Postman and click on the APIs tab on the left-hand menu. Then, click import. Select the file we’ve just downloaded. Now, in the menu you should see a list of all the available commands grouped per function group.
Configuring the base URL
When using a command from the OpenAPI specification, you’ll see that there are several variables used in your request URLs. One of these is the base URL. In order to change this to suit our base URL, click on the DATPROF Rest API folder, and navigate to the Variables tab. You should now see the initial value and the current value for the base URL. Change this for your currently used URL.
In my case, I’m accessing Runtime through http://localhost:7070. For this, my baseUrl initial and current values should be localhost:7070
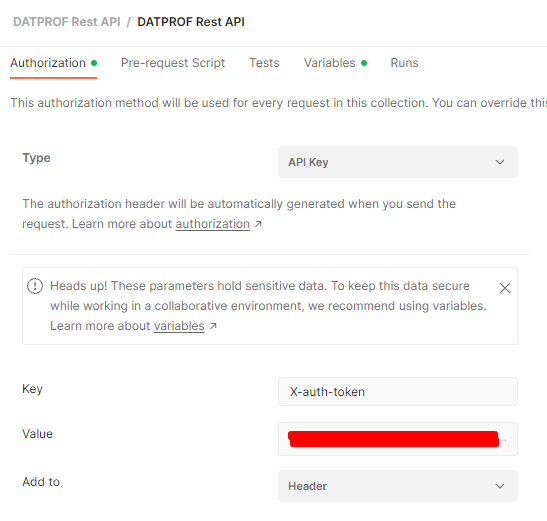
Configuring Authorization
In order to eliminate the need to add the API key to the header of all requests manually, we can supply it on the DATPROF Rest API folder level in Postman. To do this, simply click on the DATPROF Rest API folder, navigate to the authorization folder, and copy the following settings.
Retrieving a list of existing environments
This query will be the same as the above example on how to interpret the documentation. Because this is a GET command, we do not need to write a JSON with data. Instead, we supply a Query Parameter as explained above.
Now, press SEND. You will be greeted by the following error:
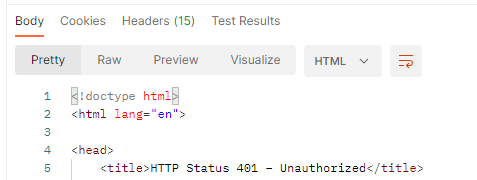
This error is generated because we didn’t add our API key to the request’s header. Any call without a valid API key in the header will be rejected by Runtime. In order to add this, click on the headers tab below the URL. Here, add your API token as a value.

Now, press SEND again. You should now see a result in the body tab of Postman.

Getting information about your environments/projects is an important part of designing scripts, as this is data you’ll need to supply later to perform actions.
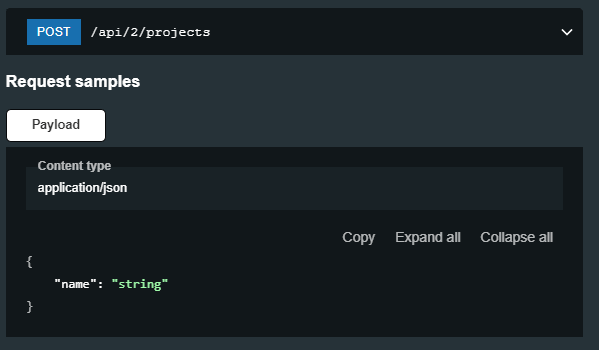
Creating a new Project
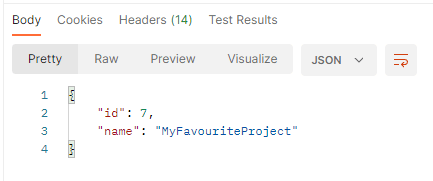
In order to create a new project we’ll need to POST to the API. If we navigate to the projects tab in the API docs we can see we need to supply the following:
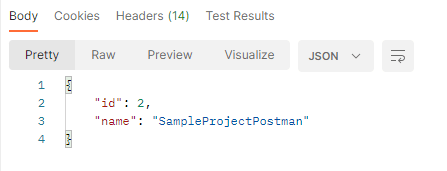
Upon changing the name value and posting this to <your_url>/api/2/projects, Postman returns the following body to us, letting us know this it was successful in creating a new project.
Creating a new environment
Now that we have a new project, we can add an environment to it. Let’s take a look at the template for this command.
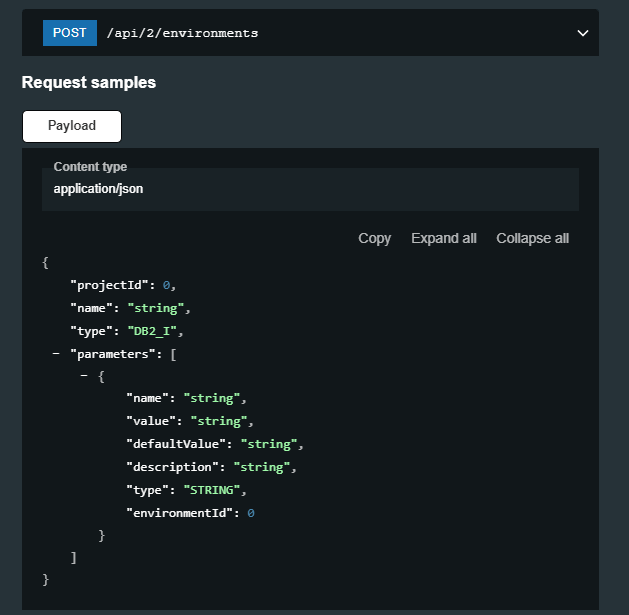
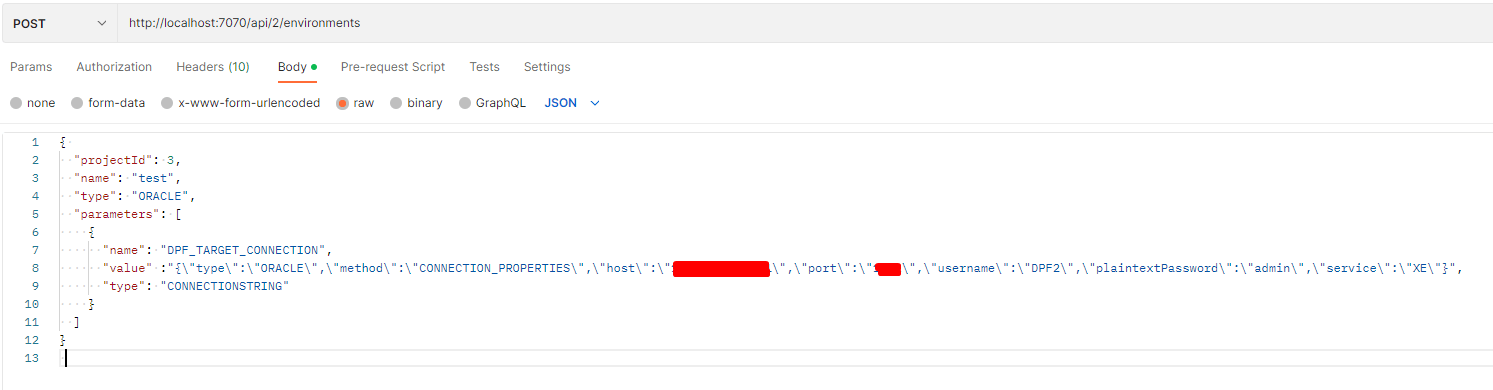
This is the first script template that uses a JSON inside of another JSON. If we try to execute a script that’s in line with the template here, we’ll encounter an illegal character error. In order to resolve this, we need to use the escape character ( \ ) before every double quotation mark ( “ ). The resulting script will look something like this:
Upon completion of this script, Postman will return the parameters of our created environment.
{
    "id": <your_environment_id>,
    "name": "<your_environment_name>",
    "type": "<your_database_type>",
    "status": "UNINSTALLED",
    "database_type": "<your_database_type>",
    "connection_string": "<username>@<host>:<port>/<service>",
    "projectId": <your_project_id>
}
Uploading an application ZIP file
In order to upload an application file, we’ll need to change up our approach. Looking at the specification within the documentation, we see that the only requirement is POSTing the file in the request’s body, formatted as a binary string. The easiest way to do this is to use the form-data body type within Postman, and adding a “file” key, and using the value field to browse towards our project ZIP file.

You should now be able to see your application appear under the Applications tab in your Runtime UI.
Installing an application
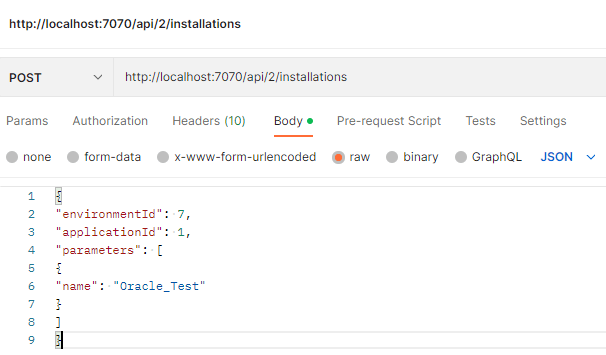
Now that we’ve uploaded an application, we’re going to try and install it into an environment.
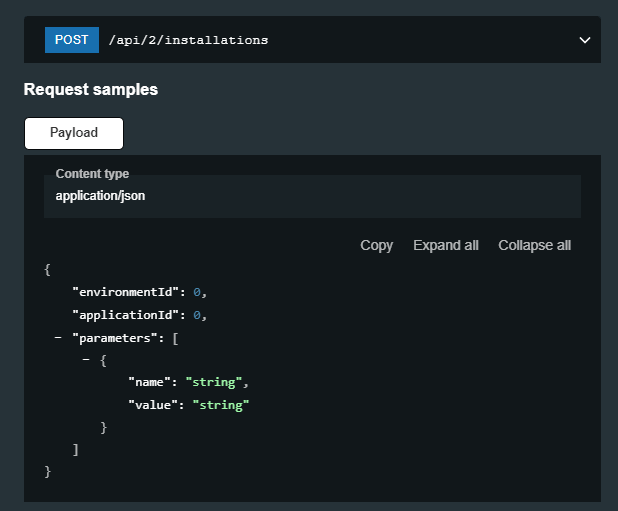
Parameters are not strictly required here, but I’d like to rename my application, and thus I’ve chosen to supply a name value. If you are uncertain what your environmentId or applicationId are, you can pull up a list of your applications and environments using the available GET commands.
Our JSON should look something like this:
Starting runs
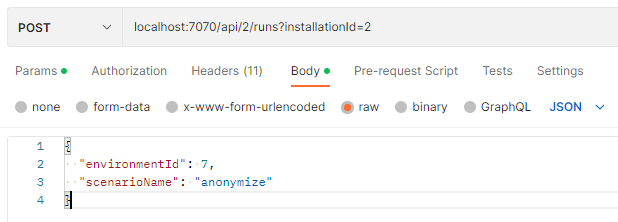
In order to create a new run, we need to supply the installationId as a query parameter, and define a request body schema that includes the environmentId and a scenarioName. An example is attached below.
The scenarioName is named “identifier” under the “scenarios” tab when retrieving the list of applications with a GET command.
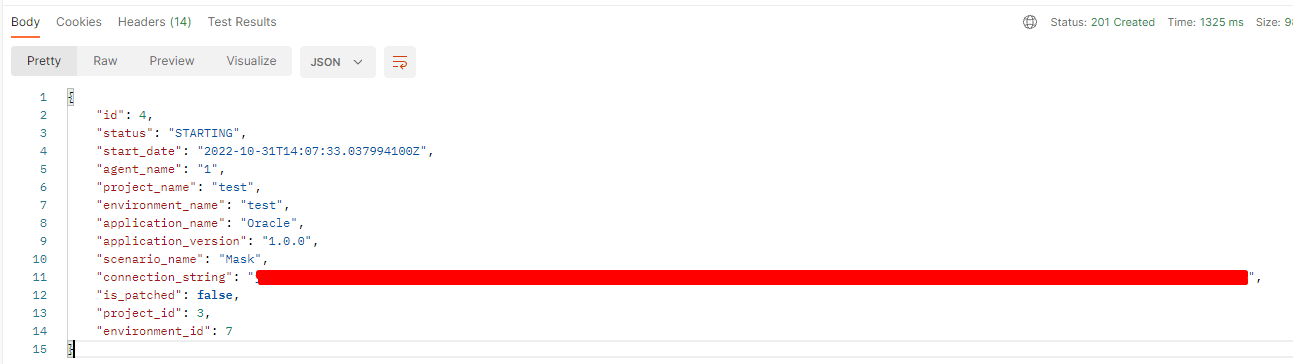
If this command is successful, Runtime will start the application.
Now we’ve created a group(project), with an environment that’s connected to a database, and uploaded and executed an application. These are the basic steps needed to start automating Runtime execution through the API.
Executing collections
After having defined individual calls, it’s possible to add calls into a collection. A collection is a group of calls which can be executed sequentially; which for our use-case would allow us to execute all the previous steps without having to execute every step individually.
One important step which we’ll have to do before this, however, is making sure we save some of the variables of our initial calls to use in later calls.
Creating a collection
In order to start, we’ll have to create a Collection. This can be done by navigating to the Collections tab in the top-left corner of the Postman interface, and then pressing the ( + ) button on the left-side of the search bar.
Adding calls to a collection
In order to add calls to a collection, the user can either manually create a new request by pressing the options (…) button next to the collection and selecting Add Request, or alternatively the user can simply drag & drop existing requests into the collection. On top of this it’s also possible to copy / paste requests into the collection.
Storing variables
In order to demonstrate storing variables, we’ll refer back to the call created in Creating a new Project. The response we receive after executing a valid call will look something like the following:
In addition to our previous configuration we’ll add the following to the Tests tab of the call:
var jsonData = JSON.parse(responseBody);
postman.setGlobalVariable("ProjectName", jsonData.name);
postman.setGlobalVariable("ProjectId", jsonData.id);
Here, we use the JSON.parse() command to parse the response we’ve gotten from the API call, which in common terms means turning it into an object we can dig into. After we’ve parsed the JSON, we can go into the jsonData variable we’ve made and start setting global variables by referring child records in the JSON.
In the above example, we’ve stored id and name as {{ProjectId}} and {{ProjectName}} respectively.
Editing our existing calls
If we go into the existing calls we’ve made, we can now start storing the variables we need in subsequent steps, and calling back to earlier variables. We won’t go over this for every call, but to illustrate this example, we’ll look at the variables we’ve set during the Create a New Project call, and use those to create an environment.
Because we want to create a project/group and then immediately an environment within this group, we need to know the projectId generated in the previous step. We’ve stored this variable as ProjectId in the various step, so we’ll add it in the body here as {{ProjectId}}
{
  "name": "SampleEnvironmentPostman",
  "projectId": {{ProjectId}},
  "type": "MSSQL",
  "parameters": [
    {
      "name": "DPF_TARGET_CONNECTION",
      "type": "CONNECTIONSTRING",
      "value": "{\"type\":\"MSSQL\",\"method\":\"CONNECTION_PROPERTIES\",\"host\":\"my-test-host-1\",\"port\":\"1433\",\"username\":\"YB_T01\",\"plaintextPassword\":\"YB_T01\",\"database\":\"YB_T01\"}"  ,
      "description": "This is an example environment made with Postman"
    }
  ]
}
To continue using variables, we’ll need to store variables from this response as well. We know that the following step (uploading an application) doesn’t require any specific variables from this response. Installing said application requires the ApplicationId of the uploaded application and the EnvironmentId to install to.
To store the EnvironmentId here, we’ll add the following to the Tests tab:
var jsonData = JSON.parse(responseBody);
postman.setGlobalVariable("InstallationId", jsonData.installationId);
To store the ApplicationId in the call to upload an application, the following can be added to that call’s Tests tab:
var jsonData = JSON.parse(responseBody);
postman.setGlobalVariable("ApplicationId", jsonData.id);
In order to completely modify the requests don’t forget to edit the requests detailed in Starting Runs, and to save the variables returned in Installing an application!
Running a collection
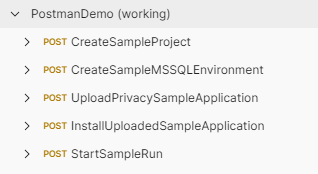
After following the preceding steps and going over every call, your collection could look something like the following:
To run the collection, right-click the collection and select Run Collection. A screen should now open on the right-hand side of the interface. From these settings the only one we’ll need to adjust is the Run configuration → Delay value. This is a built in delay to prevent commands from running into timing issues. For testing, I would recommend setting this to 400 ms.
After this, press Run <collection_name>.
What’s next?
These steps are a very basic introduction to designing APIs. Further improvements can be made, such as:
- Turning the individual requests into a chain by making a flow, or expanding on the configured collection.
- Passing more variables from one request to another
- Receiving information about past runs (logs, audit data and other information)
- Checking on the status of current runs
By now, you should be well equipped to interpret the Runtime API, and perform basic scripting tasks with Postman. In order to further test and improve integration, you can refer to the Postman documentation here.