(Optional) Creating the demo Workflow
In order to create a new Workflow, follow these steps:
- Open Runtime & log in
- On the left hand side menu in Runtime’s main menu, click “Workflows”
- Click “New Workflow” in the top-right corner.
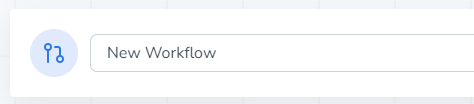
After this, you’ll be greeted with the Workflow interface. We can start adding modules and changing the lay-out, but before we do this let’s rename the Workflow. To do this, in the top-left corner of the Workflow interface click on the current name (by default this is “New Workflow”) and enter a new name. After this, press “Save”.
Adding modules
In order to better understand how Workflow works, we’ll be making a template that executes a Subset and Privacy template, and notifies us when specific events happen through email.
This template will use most of the available modules, aside from the “If” module. This is a simple logic gate.
Every Workflow starts with the “Start Module”. This is a module that only serves to generate a signal when you press the “Execute” button. Let’s test this out by making a simple chain to send an email with some extra data.
- From the left-hand module menu, drag and drop the “Powershell” module into the interface.
- Do the same with a “Send Email” module
- Connect the modules together by clicking and dragging from the nodes on each module. Modules can have an input handle, and one or multiple output handles.
Your Workflow should now look something like this:
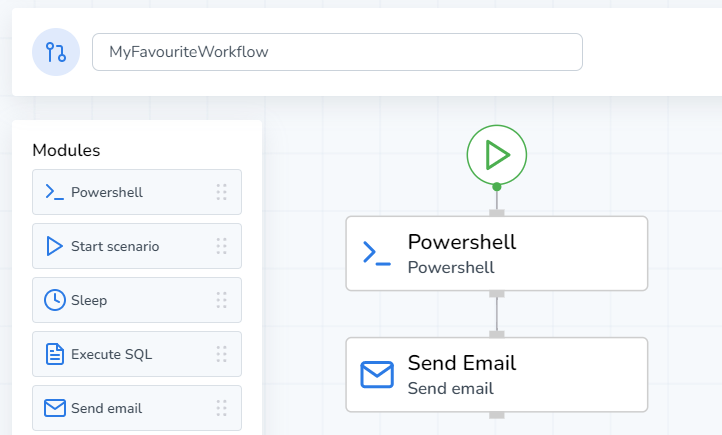
If we press “Execute” now, the start module will generate an output signal, and call the Powershell Module. After the Powershell module finishes, it will in turn generate its own output signal, and call the Send Email module. After the Send Email module has finished processing, the run will end.
Configuring the Start Module
The start module is quite simple; it just sends an output signal. However, we can input fixed output parameters here. This is useful if we’re certain we have static information that we’ll be using throughout the workflow. Because we’re going to send an email, let’s save that email address as an output parameter.
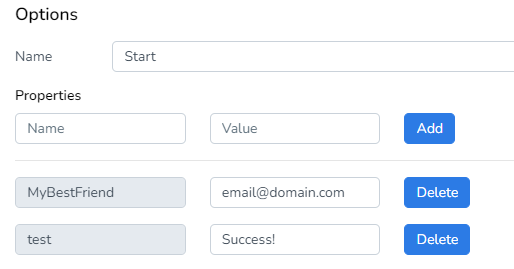
If you know you’re going to reuse specific data, save it as a parameter. This way, if you decide to change it later, you only have to change it in this one spot!
Configuring the Powershell Module
To start off, we’ll add a simple script into the Powershell module in order to generate some data. While in edit mode, click on the Powershell module. Then, in the script textbox past the following code:
$Date = Get-Date
Write-Host $Date
"DPF_OUTPUT:GetDate=$Date"
You should be able to see that a new output has been added. In Workflow, to use Powershell variables as an output you need to use a special syntax.
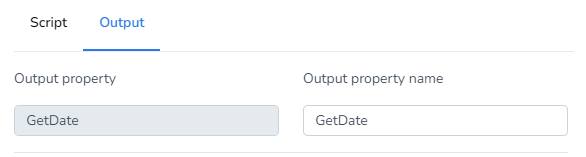
In the Powershell module, you need to denote something in the script as an output parameter. The syntax for this is {“DPF_OUTPUT:<parameter_name>=<parameter_value>”}
What we’ve made here is a very simple script that will print the current system time, and save it as an output.
Configuring the Send Email Module
Now that we’ve got some data ready to be shared with the world (or our testers!), we’re going to configure a way to send it in an email.
- Click on the Send Email module
- Next to Recipient, click on the “<>“ button. Then, click on “Start“, and pick the property for an emailadres we’ve defined earlier.
- Press “Use Property”
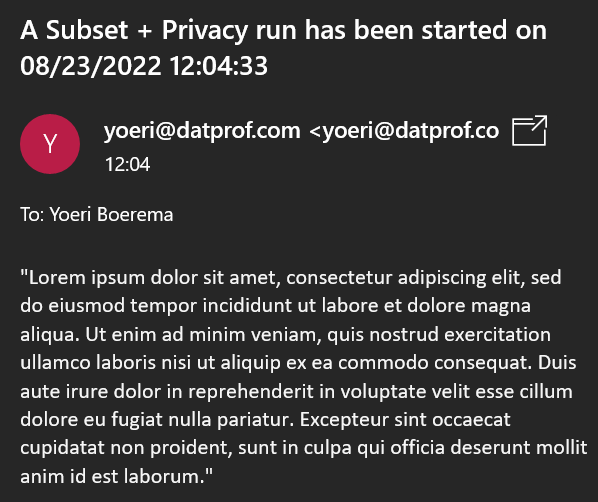
- Add a subject to your email, i.e.: “We’re about to start a Subset run!”
- Add some text to the body of your email. Anywhere in this email it’s possible to use the time we generated in the previous Powershell module. You can include it in the subject, or in the body.
In order to send an e-mail, you need to configure your email settings. to find out how to do this, refer to the Runtime Documentation.
Currently, it is only possible to send emails within your own email domain.
Executing our first run
Once you’ve made an email template it’s time to test it. To do this, follow these steps:
- Press “Save and close”.
- In the same location, you’ll see “Execute”. Once you press that button the Workflow will execute.
- All going well, you should see an Email appear in your inbox.
Now that we’ve made a very simple workflow, we’ll start working on creating a complex Workflow that executes a subset template, a privacy template, and monitors whether runs have succeeded or failed.
The Workflow Demo uses most modules, and can be daunting for new users. As it is an example that serves to show you what Workflow can do. Feel free to change inputs or modules to get familiar with the process.
Certain modules (Like Powershell) are frameworks for code, and as such you can achieve much more with them than what is handled in this training. We’ll use simple snippets to show that the concept works, but feel free to make more complex scripts.
Executing Subset/Privacy Templates with Workflow
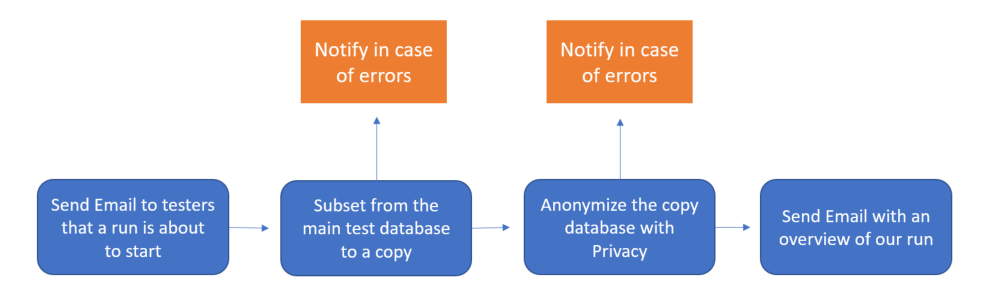
We’ve let our testers know that we’re about to start a run, but we still need to change our Workflow so that we fulfill the needs of our testers. In a nutshell, our execution should look something like this:
In order to configure a Subset/Privacy run, follow these steps. For this, add on to the workflow we’ve configured in the previous chapters.
- Drag and drop a “Start Environment” module into the Workflow
- Connect it to the start module directly
- Click on the module and rename it “Subset Run” so we know what the environment will do within the context of this run
- Select an environment, and an application to run. This will be the Subset run pre-configured on the testing VM.
- Select (Re)-Fill as our scenario
The pre-configured Subset application is fairly straightforward, and should Subset your eventual data to the copy database with about 1/4th of the data we’ve started with.
- Now, repeat the steps, but for a Privacy application. This should be the same process.
- Connect the two modules with each other
What we’ve created now should look roughly like the following:
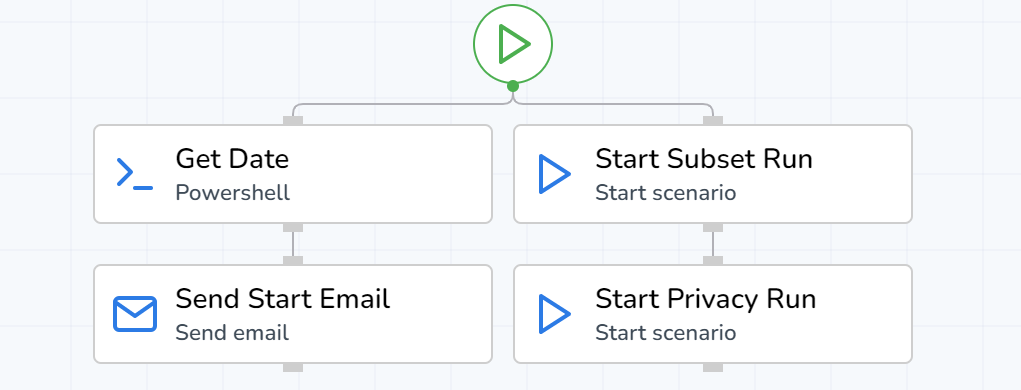
This configuration will simultaneously start determining the current date in the Powershell module, and start the Subset run. After this, the Privacy run will automatically start. You could also connect all the modules in one line here, so that the Subset run will only start once the Powershell and send email modules have both completed.
This configuration is perfectly serviceable, but has a few flaws in it. Workflow doesn’t necessarily “stop” when it encounters an error, and will try to continue a run to the best of its abilities. This could lead to the Subset run failing (leading to wrong/no data in the copy database), but the Privacy run still starting. If this happens, we’ll waste unnecessary time running templates, when we should have reset the total run. Luckily, we can build some checks into our Workflow to prevent this!
Configuring the Result Switch Module
The result switch module is a simple module that allows us to change the course of a workflow depending on whether a preceeding module has succeeded or failed. Let’s us these to handle any potential issues during a run. To do this, follow these steps:
- Click on the line connecting the two “start environment” modules, and press the delete button that becomes highlighted on the line.
- Drag in a result switch, and connect the output of our Subset module with the input of this module.
- The result switch has two outputs, “OnSuccess” and “OnError”. Connect the “OnSuccess” output to the Privacy module.
- Repeat this process for the Privacy run module.
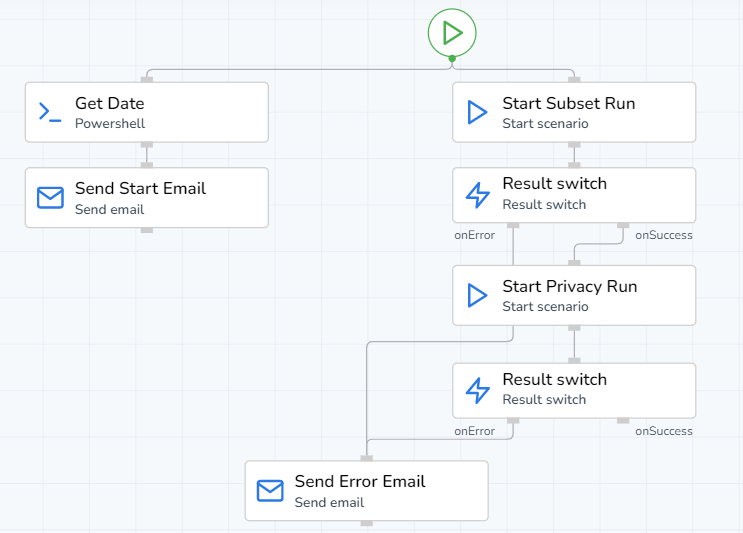
Your Workflow should look something like this now:
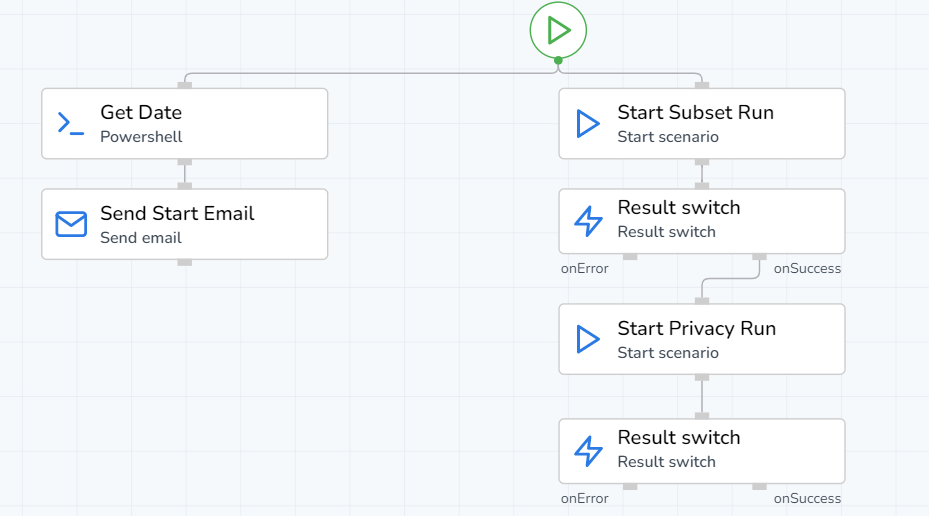
This run has result switches, and will prevent a Privacy run from being started if the Subset run fails. Ideally we’d like to be notified when a run fails so we can proactively resolve errors. In the following image, I’ve attached an e-mail module that will get trigger if either of the environment runs fails
Now when a run fails, we’ll be notified immediately!
Gathering our run statistics
At this point in our template, we’ve configured most of the common functionality we need. However, we can use the data output of preceding modules to compile an email which bundles all of the generated run data. To do this, follow these steps:
- Drag & drop a “Send Email” module into the Workflow
- Connect it to the onSuccess node of the preceding “Result Switch”
- Configure the Email as before by specifying a recipient, subject, and email body
- Open the parameter menu “<>“ for the attachment field, and add the deployment log and audit log parameters from both the “Start Subset Run” and “Start Privacy Run” modules we’ve configured earlier.
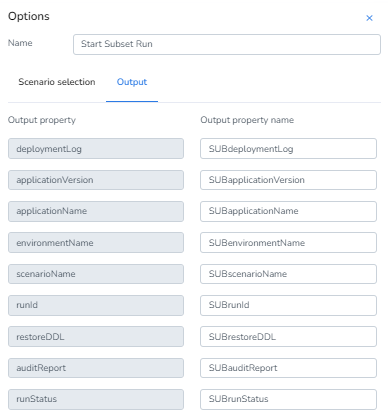
You’ll notice now that when you attempt to select parameters from the Privacy run, all the parameters are grayed out.
If more than 1 parameter with the same name exists, only the latest parameter is available for selection. In this case, because the subset run is executed before the privacy run, and they both share the same output property names, Workflow thinking that the Subset output is just an older version of what we’ve generated with the Privacy run, and overwrite this. To correct this, open your “Start Subset Run” module, and go to the output menu. Now, add a prefix to your generated parameters. It should look something like the following:
Now, when we execute the run we’ll automatically perform two runs and notify our testers every step along the way. This is a functional Workflow, but there are a few extra modules that we haven’t utilized yet. Therefore, in the following chapters we’ll gather some extra data about our databases with the “Execute SQL” module, and use the “Wait for all” module to make the workflow more robust.
Collecting extra database information with the Execute SQL module
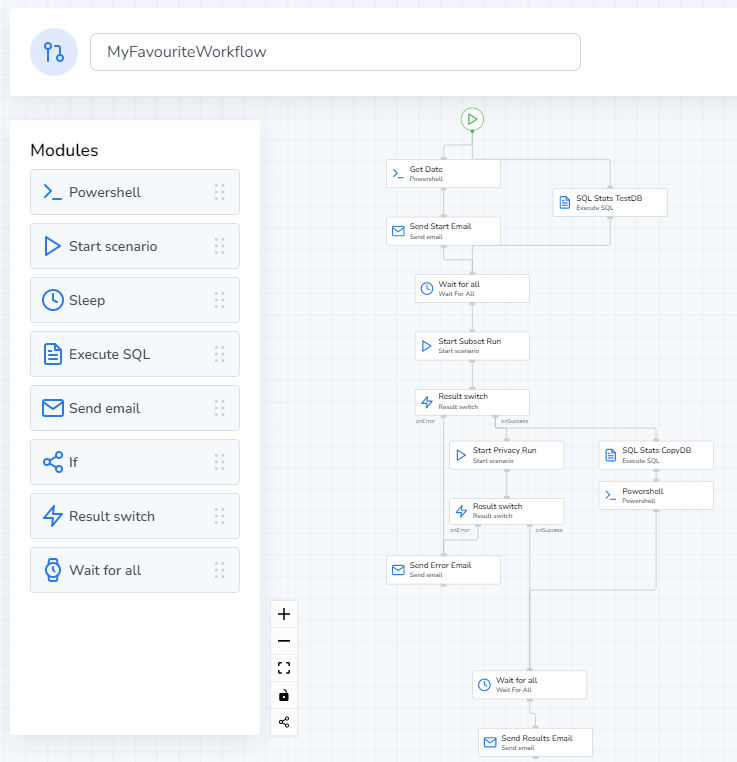
In order to give us more insights about how a run progressed, we’ll query the database to see how much of a size difference we’ve achieved post-subsetting. In order to do this, rearrange your Workflow to match the following example:
When using the SQL module, it’s important to prevent them from running parallel to a start scenario on the same database/schema. If you do not do this, it’s possible that you cause a run to fail due to conflicting SQL queries.
When configuring the SQL modules, follow these steps:
- Select the module and select our environment
- For the Query, specify the following code snippet and replace the where parameter to suit your specific schema:
select sum(bytes)/1024/1024/1024 from user_segments - Go to the Output and rename our result. I’ve chosen to name mine “BeforeSize” and “AfterSize” for TEST_1 and TEST_2 respectively, as the queries measure the total size of a schema.
Make sure you select the correct environments and schema’s to execute the SQL query on. The initial SQL query should be executed on TEST_1 and the latter one should be executed on TEST_2.
These modules will give us the size of our original and our copy database in GB. Now, we’ll add a simple Powershell module to figure out how much our Subset run was able to reduce the original dataset by comparing the two outputs. Follow these steps:
- Open the Powershell module
- In the Script, specify the following code:
$Reduction = ((($AfterSize - $BeforeSize) / $BeforeSize) * -100)
Write-Host $Reduction
"DPF_OUTPUT:Reduction=$Reduction"
Now we’ve generated an output variable named “Reduction” that returns the percentual reduction in size our Subset run has achieved. We can include this info in our earlier Email module to give us a better idea of how the run has progressed. This is only a simple example of what you can achieve with the Powershell module, and you can create much more elaborate queries to collect and output more varied data.
Configuring the Wait For All module
The wait for all module is quite simple, but helps to prevent timing issues between various parallel modules. There can be situations where you want all the modules before a specific point to be completed before you continue the workflow.
The wait for all module waits until all of the modules that are connected to it and preceed it are completed. Let’s zoom in on a specific area of our Workflow.
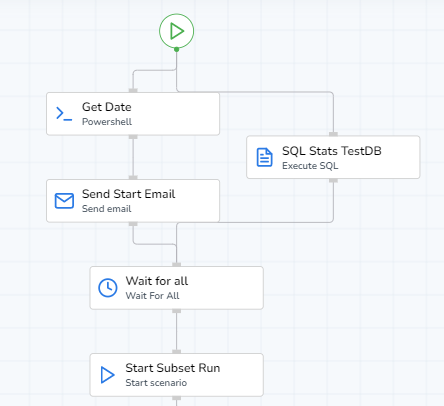
Here, we send the start email and check the size of the original schema before subsetting. We can run these two tasks in parallel, but it’s important to run the SQL module before the Subset run to prevent query conflicts. The Wait for all module helps us run these two efficiently in parallel without starting the Subset Run too quickly.