General Functionality
This chapter describes the global functionality which can be found in the title and menu bar of DATPROF Privacy. Following chapters give detailed descriptions of the core functionality of DATPROF Privacy.
New project or existing project
Once DATPROF Privacy is started a dialog is shown where the user can choose to create a new project or open an existing project. The user has three options:
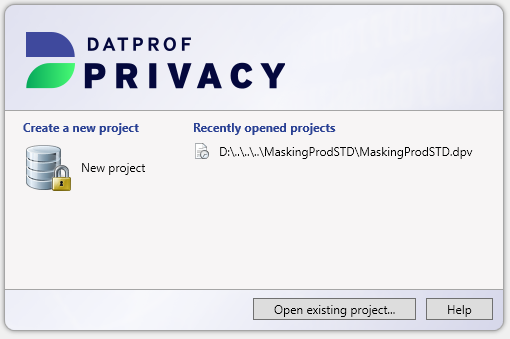
New project: This option asks for a project name and location where the project should be saved. These fields are pre-filled with a default value. After confirmation, an empty project is created and opened in the Project Settings window
Recently opened projects: The right side of the dialog shows the recently opened projects. By clicking on one of these projects, the last saved version of the project is opened.
Open existing project: This option shows a dialog which can be used to open a saved project.
Upgrade of projects
When opening an existing project a check is done on the version number of the project file. Whenever this version is lower then the version DATPROF Privacy expects an upgrade is required.
A dialog opens informing you an upgrade is required. By clicking the OK button a copy of the project and all the scripts is made to the sub-folder “backups” of the project. Then the project is upgraded and a message is shown the project has upgraded.
You can find the backup in:
<project>\backups\BACKUP_<ModelVersion>_<Year>_<Month>_<Day>_<Hour>_<Minute>
When you click on Cancel the project remains unchanged.
When a higher version number is detected the project cannot be opened.
Menu
Several features of the application can be started through the menu. The menu contains four options:

File
Project
Visualize
Help
File
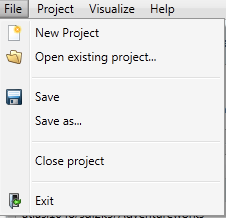
New Project: Opens the dialog to create a new project.
Open existing project: Opens the dialog to open an existing project.
Save: Saves the changes of the current project.
Save as: Saves the changes of the current project as a new project.
Close project: Closes the current project, then opens the opening dialog.
Exit: Closes DATPROF Privacy.
Project
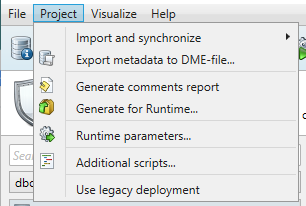
Import and synchronize
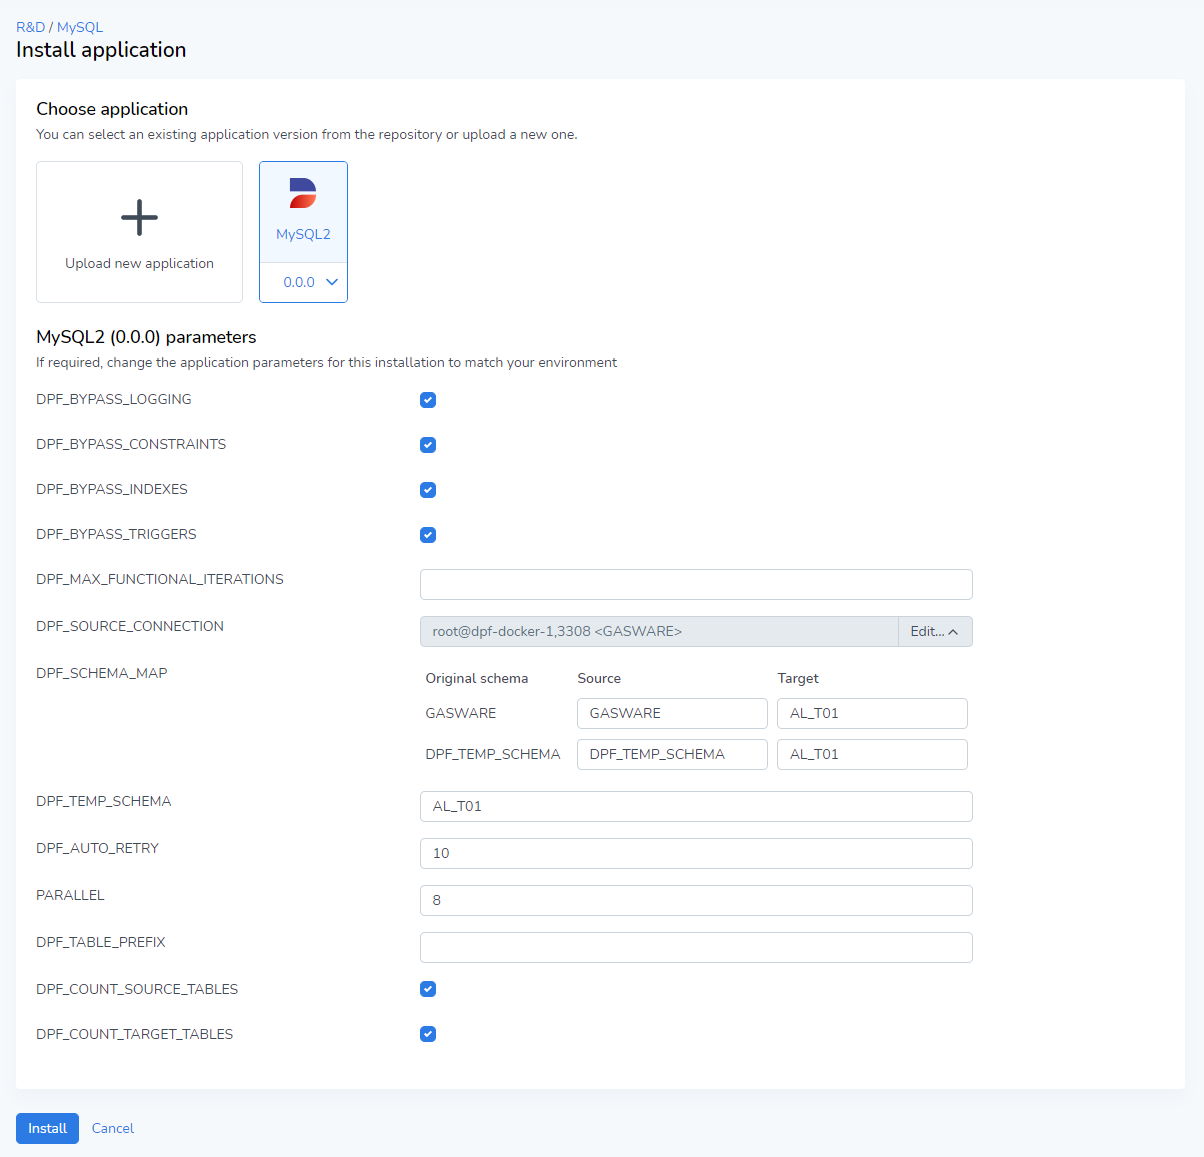
This option allows the user to import/synchronize database metadata through a wizard (which connects to the database over JDBC), or to import metadata through a DME-file. DME files are a generic DATPROF file format, which are generated by our software when exporting metadata.
Export metadata to DME-file
This option allows the user to export (parts of) a data model to a generic DATPROF file format. This file format can be used within the DATPROF product range to exchange the data model and metadata.
Generate comments report
This option parses all the information in the project, and distills it down into an HTML overview of the data used in the project. For instance, this will show all used functions, their names, comments, description, and other information relating to the project.
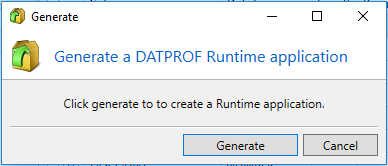
Generate for Runtime
This options generates a package with all template code, which can then be uploaded to DATPROF Runtime. When generation is complete, the Windows File Explorer is opened automatically in the directory in which the .zip package is generated.
Runtime parameters
The Runtime parameters menu enables the user to specify either string variables or boolean parameters. These variables are generally used by scripts defined in the Script Manager. This can help prevent having to hard-code scripts if a script is being used for for instance several different databases. Once a variable is defined, and saved by pressing the Save button, you can start calling it in your scripts.
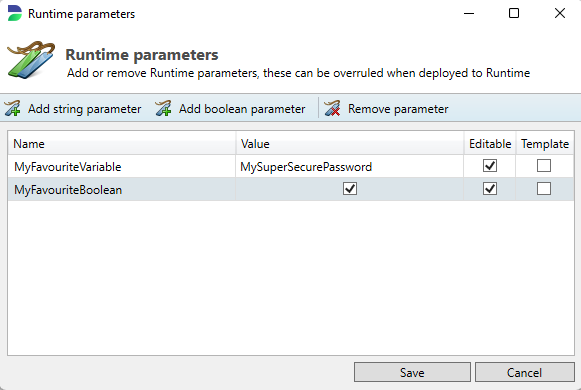

After uploading to Runtime, Runtime parameters can be modified if you tick the editable box!
Using Runtime Parameters in SQL scripts
You can use parameters in your SQL script too by checking the velocity script option in the script manager. Then, to indicate your parameter you can use the following syntax:
Syntax:
${dpf.parameters.<parameter_name>}

Example:
${dpf.parameters.MyFavouriteVariable}

Output:
MySuperSecurePassword
You can also use a collection of standard parameters generated in each Privacy project. If you open Runtime, and look at the settings of a specific application, you can see what each parameter is called.
Looking at the above example, we can expect something like the following:
Syntax:
${dpf.parameters.<parameter_name>}

Example:
${dpf.parameters.DPF_TEMP_SCHEMA}

Output:
AL_T01
On top of this, you can also use the schema map which is configured in Runtime. This ensures that the user is able to dynamically mask, and that scripts also use dynamic features. An example below:
Syntax:
$dpf.db.format($dpf.parameters.DPF_SCHEMA_MAP.lookup("<schema>"))

Example:
$dpf.db.format($dpf.parameters.DPF_SCHEMA_MAP.lookup("GASWARE"))

Output:
AL_T01
For some databases, such as MS SQL Server, additional parameters may be required to execute this function. This example merely demonstrates that looking into the schema map is technically possible.
Using Runtime Parameters in OS scripts
When calling a Runtime parameter from within an OS script, the normal method of calling a variable is sufficient, but annotation as explained in the SQL sub-chapter is also possible, if the velocity script option is toggled on.
Syntax:
%<variable_name>%
When using Velocity:
${dpf.parameters.<variable_name>}

Example:
%MyFavouriteVariable%
When using Velocity:
${dpf.parameters.MyFavouriteVariable}

Output:
MySuperSecurePassword
Additional Scripts
Opens the Script Manager where you can define scripts (on either a SQL-level or OS-level). For a complete overview, please refer to the Script Manager section of this page.
Use legacy deployment
Enables the pre-4.0 direct deployment scheme. From version 4.0 onwards the default scheme for Direct Deployment will use the embedded Runtime Agent. This option should not be used unless instructed by DATPROF, as it exists to combat a few edge cases. Performance in this mode is worse than in the standard deployment, as well as less functionality being available.
Visualize
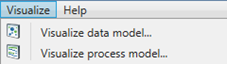
Visualize data model: Shows a visual representation of the imported data model, including all (user defined) relations.
Visualize process model: Shows a visual representation of the order in which masking functions are going to be executed.
Help
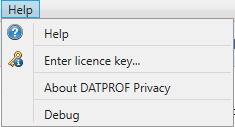
Help: Opens the help-screen.
Enter license key: Opens a dialog which can be used to enter a purchased license key.
About DATPROF Privacy: Opens the About Screen of DATPROF Privacy.
Debug: Opens a Developer Logging with a list of threads.
Generate for Runtime
As of DATPROF Privacy version 3 you can separate development and deployment of a Privacy project. This is not available for all databases.
Check the chapter Direct Deployment and Runtime Deployment to get the list of available deployment options per database.
You can generate a package to be uploaded and installed in your DATPROF Runtime application. Under Project -> Generate for Runtime you can click “Generate” and a zipfile named <projectname>-<version>-priv.zip is generated and saved in the subfolder dpfgen of your project.
This package contains the settings, process and all the code to execute the Privacy project.
DATPROF Runtime is a separate product not contained in the Privacy distribution.
Every “Generate” empties the dpfgen folder and removes existing packages.
Check the Datprof Runtime manual for the compatibility matrix of DATPROF Privacy and DATPROF Runtime
Script Manager
Overview
In order to access the script manager, the user should Project → Additional scripts.. in the top-left corner of the Privacy interface. Here, the user is able to define custom scripts that can be used in combination with masking functions. Both SQL and OS-call scripts are supported. Using these scripts, the user can execute almost any database operation allowed by the database permissions. Care should be taken however that all SQL scripts are executed over a JDBC connection to the database, so results of queries may be slightly different from when testing these in a DBMS. For almost all use-cases this is not the case however, and can be resolved through some syntax changes. In addition to ‘plain’ SQL, a user can also use PL/SQL (Oracle), Transact SQL (SQL Server) , SQL PL (DB2) or PL/pgSQL (PostgreSQL) to define scripts.
A script will only execute if it is enabled, and the content of the script itself is stored in the scripts sub-folder found within the project folder.
A SQL script is always executed as a single process and will never run parallel with other functions. This is done because it’s difficult to predict which fields will be affected by these scripts, and as such running these parallel could enable the user to create scripts that cause deadlocks on the database.
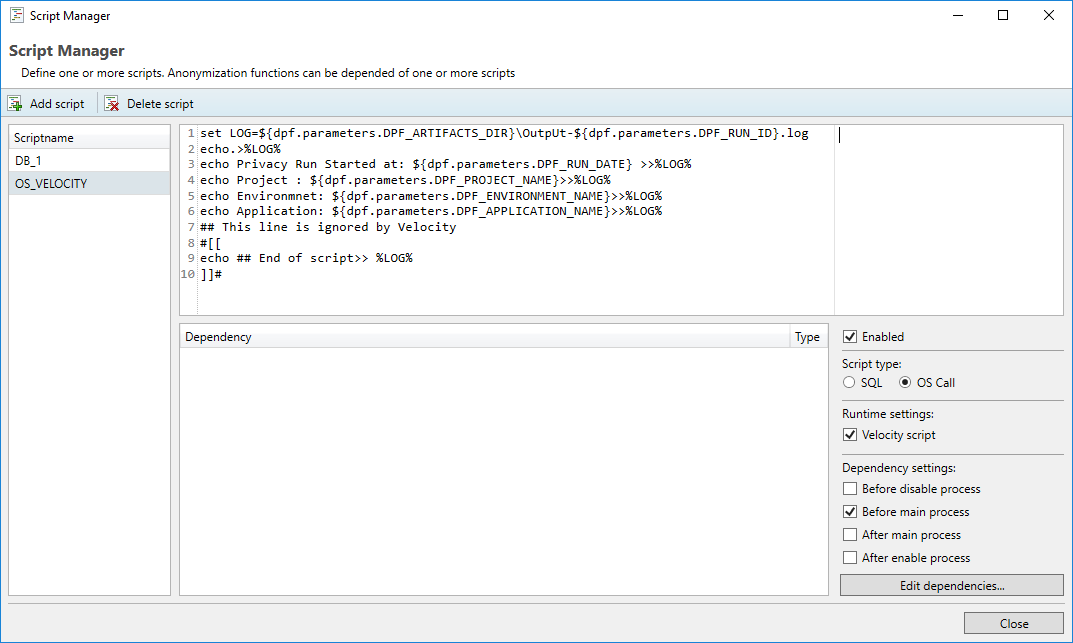
This example shows a configured script, which is set to execute after the main masking functions of a template have been completed. Because it uses velocity syntax, the “Velocity script“ checkbox is ticked.
Dependencies
It’s possible that the user requires a script to be executed during a specific moment during deployment. This can be configured by using dependencies.
If a project is used for both Generation and Masking, configuring a dependency on a run process step will cause a script to be executed, regardless of which deployment mode you choose to use. This may lead to scripts being executed erroneously. To prevent this, it’s prudent to split your generation and masking templates into different projects, or to disable any overlapping functions before starting a run.
Masking
The following script dependency options are available for the Masking chapter of Privacy:
Before or after any specific masking function
Before or after any other script
Before or after certain run process steps
Before disable process: This is the step that occurs after temporary tables for the run have been created, but before any database constraints are disabled.
Before main process: This step occurs after database constraints have been dropped or disabled, but before any masking functions have been executed.
After main process: This step occurs when the main masking portion of a run has been completed (all masking functions are done), but before constraints are re-enabled or recreated on the database.
After enable process: This step occurs after all constraints have been re-enabled or recreated on the database, but before the clean-up step where all utilized temporary tables are dropped.
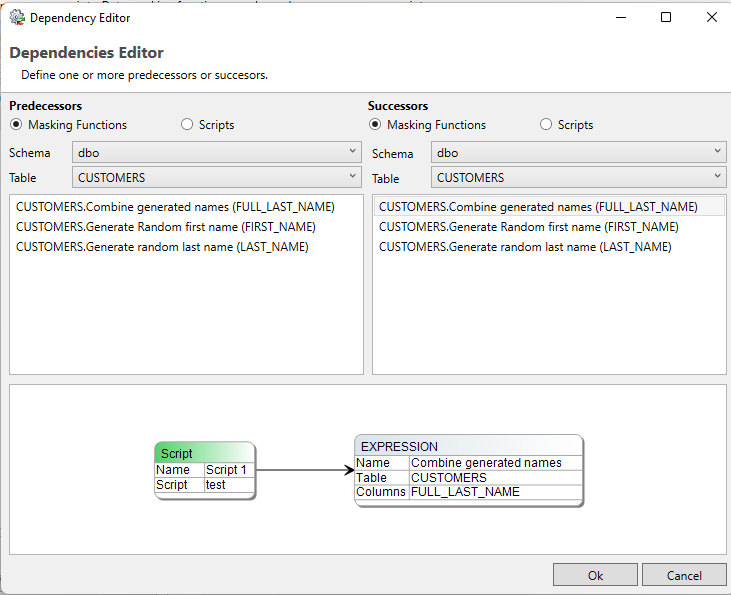
The dependency editor
In order to configure script dependencies, press edit dependencies… in the bottom-right corner of the script manager. This will take the user to the Dependency editor. An example is included below this paragraph. There are two possible dependency options, configuring another masking function or script as a predecessor causes the selected script to be executed before the script you’re currently editing. Configuring another masking function or script as a successor causes the selected script to be executed after the script you’re currently editing.
A process visualization is displayed in the bottom half of the dependency editor. In order to assess the entire process, please refer to the Visualize → Visualize Masking Process Model or Visualize → Visualize generation process model options in the top-left corner of the Privacy application.
When filtering through your masking functions, the user is able to search for functions by filtering on schema and table pairs.
Any masking function displayed in this screen uses a set syntax.
Format:
TABLE.<function_name> (<column_name>)
Example:
CUSTOMERS.Combine generated names (FULL_LAST_NAME)
Generation
The following options are available for the Generation chapter of Privacy:
Before or after certain run process steps
Before disable process: This is the step that occurs after temporary tables for the run have been created, but before any database constraints are disabled.
Before main process: This step occurs after database constraints have been dropped or disabled, but before any masking functions have been executed.
After main process: This step occurs when the main masking portion of a run has been completed (all masking functions are done), but before constraints are re-enabled or recreated on the database.
After enable process: This step occurs after all constraints have been re-enabled or recreated on the database, but before the clean-up step where all utilized temporary tables are dropped.
Due to a difference in how the main process is executed between Generation and Masking , dependency settings for scripts that would trigger before or after a specific generation set is executed are not available yet.
Velocity
For use in direct deployment and on Runtime you may choose to allow for Velocity syntax. By default this is disabled, To enable it select the checkbox "Velocity script". Velocity is not available in the legacy direct deployment scheme.
Velocity is a Template engine internally used by DATPROF Runtime to parse code, both SQL scripts and OS call scripts. Velocity is an Apache project: http://velocity.apache.org/ . Using this template engine allows users to reference and/or specify Velocity properties in your own SQL code or OS Scripts.
You can refer to properties by using the syntax ${identifier.property}
For DATPROF Runtime all DATPROF Runtime Velocity properties are available using the the dpf.parameters identifier.
Example: ${dpf.parameters.DPF_RUN_DATE}
Scripts are saved in the ‘Scripts’ subfolder of the project.
Bear in mind that Velocity parses # and ##. This might effect your code. To handle this situation you either adjust the code and avoid these characters, mark code as "Unparsed content" or disable Velocity for this script.
For more information on the use of Velocity in Runtime check the "Velocity" chapter in the Runtime manual ( http://docs.datprof.com/runtime )
Example Script using Velocity including Comment line and Unparsed content.
set LOG=${dpf.parameters.DPF_ARTIFACTS_DIR}\OutpUt-${dpf.parameters.DPF_RUN_ID}.log
echo.>%LOG%
echo Privacy Run Started at: ${dpf.parameters.DPF_RUN_DATE} >>%LOG%
echo Project : ${dpf.parameters.DPF_PROJECT_NAME}>>%LOG%
echo Environmnet: ${dpf.parameters.DPF_ENVIRONMENT_NAME}>>%LOG%
echo Application: ${dpf.parameters.DPF_APPLICATION_NAME}>>%LOG%
## This line is ignored by Velocity
#[[
echo ## End of script>> %LOG%
]]#
Visualize data model
Through the menu option Visualize → Visualize data model, a visual representation of the imported data model can be opened. The displayed data model contains all imported entities including all (custom added) relations. Tables which have one or more masking functions defined are highlighted in green. This window also offers functionality for saving or printing (parts of) the displayed diagram.

Visualize process model
Through the menu option Visualize → Visualize process model, the user can view the currently defined functions and scripts as well as the order they will be executed. Solid lines signify a dependency created by the user while a dashed line indicates a dependency created by DATPROF Privacy.
DATPROF Privacy creates dependencies whenever two masking functions can target the same table at the same time. This can cause severe data corruption and deployment errors. A dependency created by DATPROF Privacy can be overruled by the user using the Dependency editor.
A quick example:
Imagine you’ve made two masking functions. One for FIRST_NAME and another for EMAIL_CONTACT.
What you could do is anonymize the FIRST_NAME field (For example “Bob” gets shuffled to “Tim”), and then use this new name in a compound e-mail address (such as Tim_TEST@gmail.com). If, by some coincidence, the function that creates the e-mail address goes off before the function that changes FIRST_NAME you could get the following scenario:
FIRST_NAME: Tim
EMAIL_CONTACT: Bob_TEST@gmail.com
in this case, you’d want to create a manual dependency that ensures FIRST_NAME always gets modified before EMAIL_CONTACT.
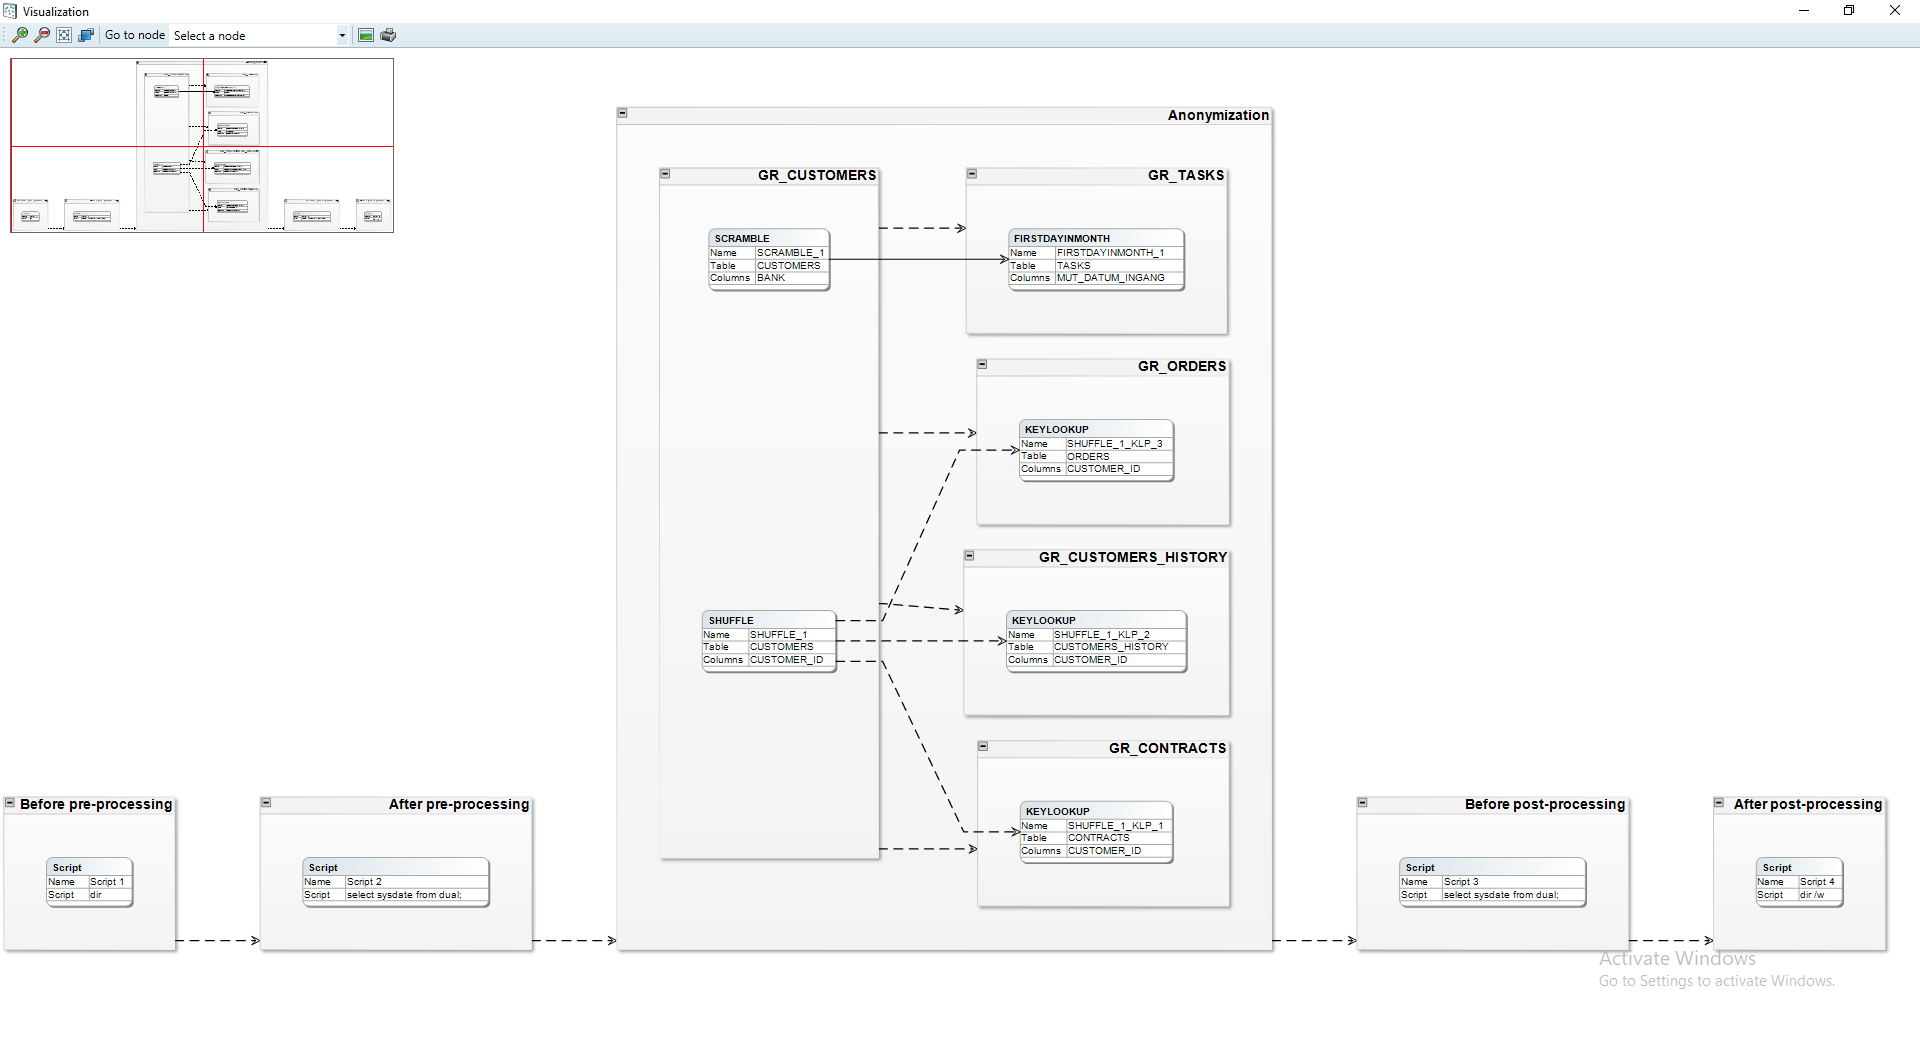
This window also offers functionality for saving or printing (parts of) the displayed diagram.
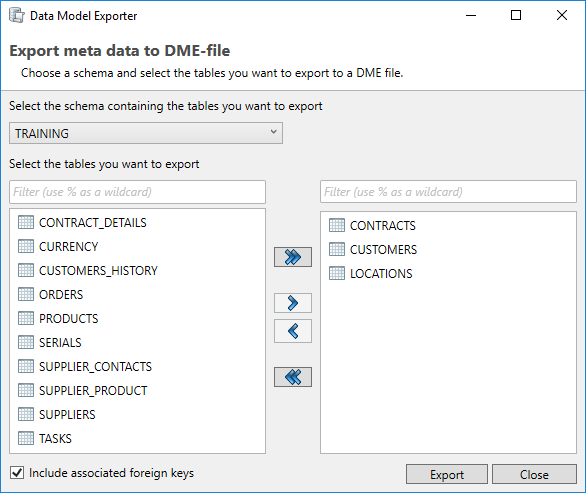
DME files
The application allows the user to exchange data models using the Data Model Export (DME) functionality. This functionality saves the data model in a generic DATPROF file format. The resulting file can be used within the DATPROF product range.
Through the menu option Project → Export Metadata to DME file, the project data model can be exported to a DME file. In the dialog the user can specify the tables (per schema) to be exported. The corresponding foreign keys can be exported too.
Using DME Files has some limitations:
DME files do not support the use of multiple schemas
Foreign Keys with a condition are not exported
Using the menu option Project → Import and Synchronize metadata from DME file the user can import a data model from a DME file into their own project.