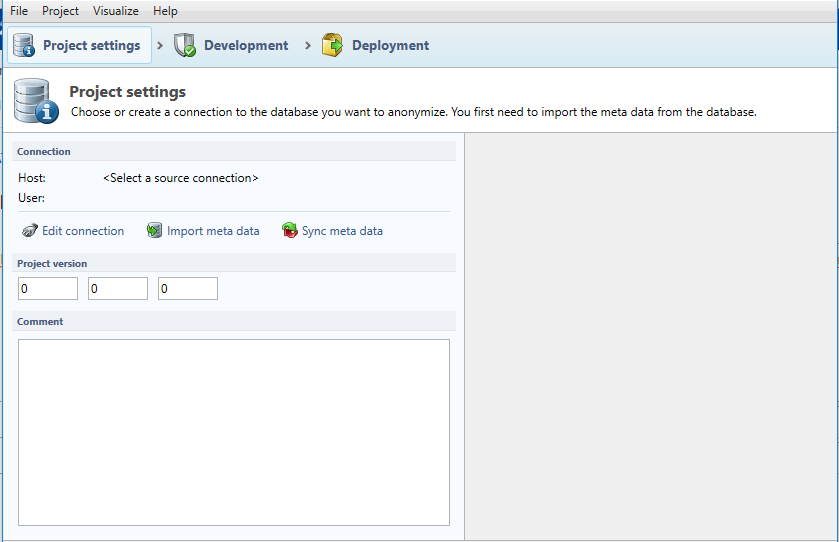
Project Settings
This screen is the starting point for any DATPROF Privacy project. It enables you to select a connection to a target database and to import or synchronize metadata.
Connection Editor
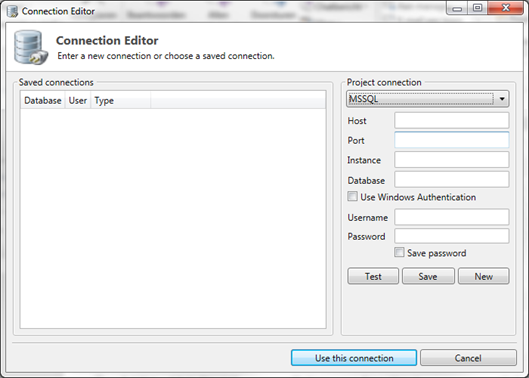
In order to mask (parts of) a database a connection to the database is required. This connection is used for the importing and synchronizing the metadata and will be used to execute the masking functions on that database.
A database connection can be specified, selected and saved in the Connection Editor. The left side of the screen displays the saved connections. The right side of the screen shows the connection details of the connection that is used for the current project, this connection is known as Project Connection. A selected connection becomes the actual Project Connection by pressing the button “Use this connection”.
When defining a connection, the following parameters are required:
Microsoft SQL Server
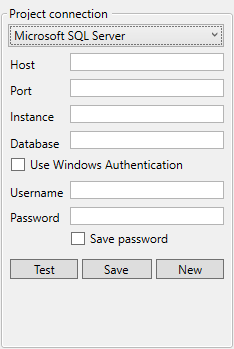
Database type: Microsoft SQL Server
Host: Hostname or IP-address of the database server
Port: TCP port on which the database server is listening
Instance: Instance name of the database server
Database: Name of the target database
If the option Use Windows Authentication is selected the credentials of the Windows-user are used to connect to the specified database. Otherwise, a valid username and password is required.
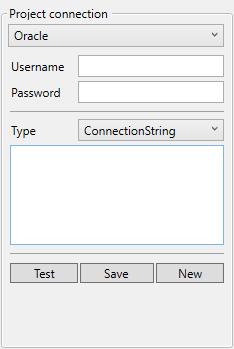
Oracle

Type: Direct for connection through the interface, or ConnectionString to use a connection string.
Username: Oracle Database Username
Password: Oracle Database Password
Host: Hostname or IP-address of the database server
Port: TCP port on which the database server is listening
SID / Service: Unique database identification, which type you need to supply is dependant on database configuration.
Connecting via a connection string
With this option an Oracle Tnsname entry can be provided to connect to the database. In order to do this, a valid Tnsnames.ora must exist.
You can also specify a complete Oracle Connection description which allows you to use all the features of Oracle Connection Manager.
Example:
(Description=(ADDRESS=(protocol = TCP)(host = datprof-server)(port = 1521))(CONNECT_DATA = (SERVICE_NAME=datprofora1.localdomain)))
PrivacyConsole.exe can use an existing ConnectionString option but you cannot specify it on the command line.
DB2 for Linux, Unix and Windows
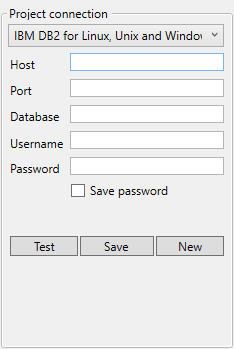
Database type: IBM DB2 for Linux, Unix and Windows
Host: Hostname or IP-address of the database server
Port: TCP port on which the database server is listening
Database: Name of the target database.
DB2 for i

Database type: IBM DB2 for i
Host: Hostname or IP-address of the database server
Database: Name of the target database
Username & Password: credentials to access the target database
PostgreSQL
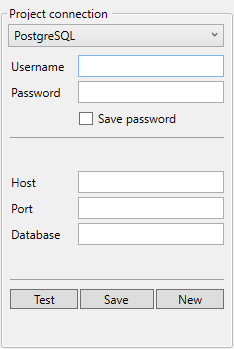
Username & Password: credentials as used in the database
Host: Hostname or IP adress
Port: Port number of the database server
Database: Name of the database to obtain metadata from
MySQL / MariaDB
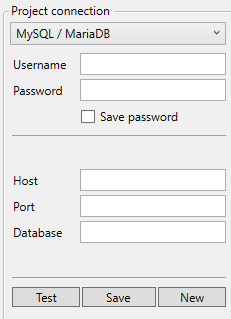
Username: Database user
Password: Password for database user
Host: Hostname or IP adress
Port: Port number of the database server
Database: Name of the database to obtain metadata from
Test, Save, New
Using the Test button the selected connection can be tested. This option will try to connect to the database using the specified connection details. The result is shown to the user.
The Save password option ensures that the login information is stored and does not need to be re-entered in future sessions.
The Save button ensures that the specified Project Connection is stored in the list of saved connections.
All connections are stored in the file “Privacy_connections.lst” in “<Windows User>\AppData\Local\<PrivacyInstallationFolderName>\privacy\”
The New button will clear the input fields allowing the user to define a new connection. You can also modify an existing entry and save it as a new entry.
Whenever a connection is saved in your project, new connections are restricted to the Database type you saved.
Importing meta data
Through the button Import metadata (or using the menu option Project → Import and synchronize → Import metadata wizard), a wizard for importing meta data of the specified database is started. Importing the metadata through this wizard consists of three steps:
Selecting the schemas and tables
Selecting the relations (foreign keys)
Importing the specified metadata
Step 1: Selecting the schemas and tables
During this first step, the user can select the tables to be imported. The screen consists of two parts.
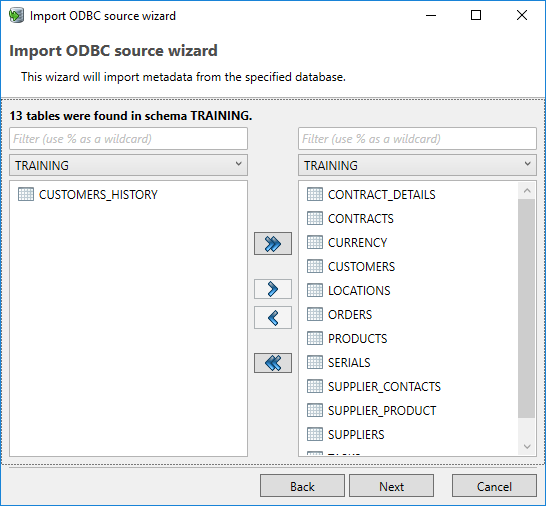
The left part shows the metadata available in the database. In the drop-down box (top-left) the schema containing the tables can be selected. In the list below the user can select one or more tables which will be imported.
The right part shows the tables selected to be imported.
With the single arrow, the selected tables are added to the list of tables to import. The double arrow will add all tables from the selected schema into the list of tables to import.
The Next button moves the wizard to the next step.
Step 2: Selecting relations (foreign keys)
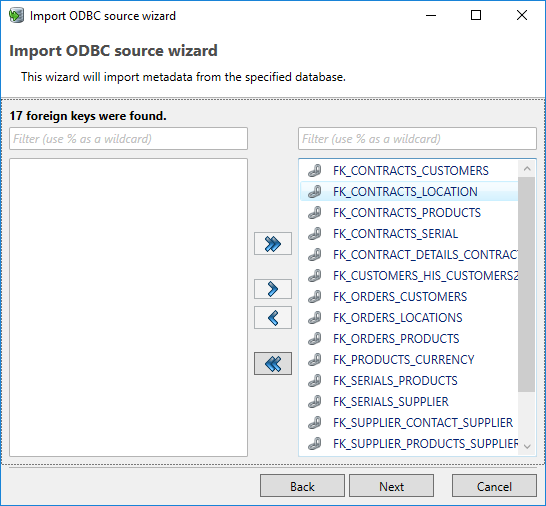
This next dialog allows the user to select the foreign key relations (FK's) to import. This dialog has the same format as the previous dialog. The list of available FK’s are derived from the selected tables. Again, the user can select one or more FK’s and add them to the list of FK’s to import.
Normally you would select them all.
The Next button moves to the next step.
Step 3: Importing the specified metadata
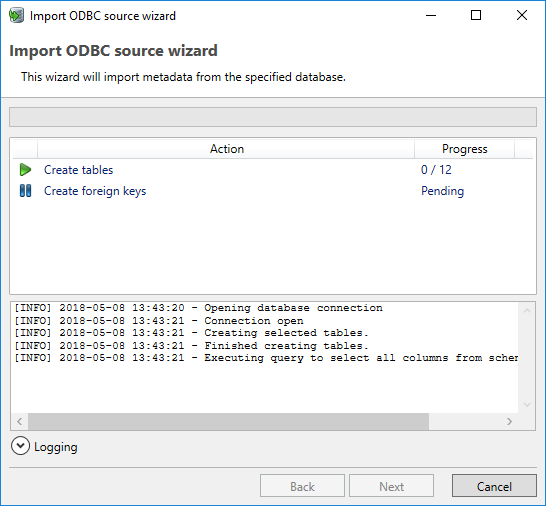
The last dialog of the wizard allows the user to begin the import of the selected metadata (tables and FK's). By clicking the Start button, the application will retrieve the selected metadata from the database.
The progress of the import can be monitored with the Progress Bar.
By clicking the Logging button the application shows the progress of the import. This logging will help to resolve any errors that may occur during the import.
Synchronizing metadata
The Metadata Synchronization Wizard helps the user to process any changes to the data model of the target database, ensuring that masking can be executed against such changes. Synchronization can take place through a DME file or an ODBC database connection (Project Connection).
(i) Remarks
The information in the database is the primary source.
Manually added Primary Keys using "Toggle Primary Key" are removed.
Manually added Translation Keys using "Toggle Translation Key" are still available.(since v3.8.3)
The Synchronization wizard does not distinguish between self-defined Foreign Keys and Foreign Keys removed from the database. They are both marked for deletion in the wizard.
A Field order change will trigger the synchronization process.
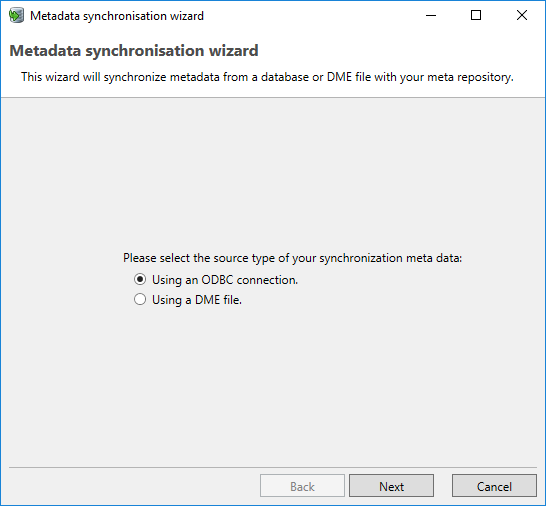
In this step, using an ODBC connection is the regular way of importing/synchronizing meta data. Functionality of DME files is handled elsewhere in this documentation.

The following screen shows a summary of the differences between the metadata from the target database and the metadata already imported into the application.
If you decide to exclude certain metadata from an initial import, they will show up here too. The system cannot differentiate between “new” differences, and ones that have already been acknowledged by the user and accepted during an initial import. This synchronisation simply compares the metadata present in the project to what a new request for metadata to the database returns.
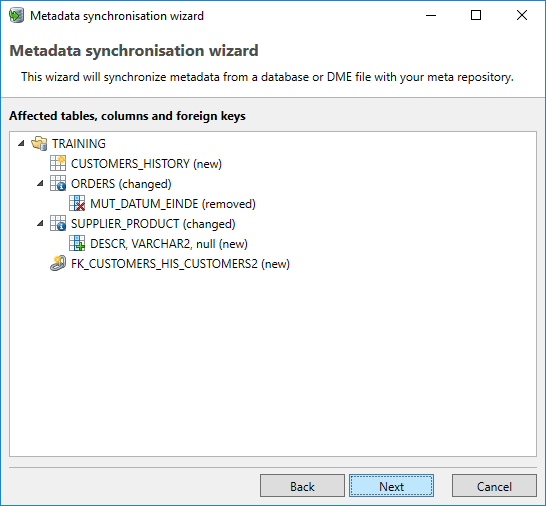
Changes may include tables, columns and FK’s. These can be added, changed or deleted.
By clicking the Next button, a dialog will be opened for each type of change, where the user can decide whether to process the change in the project.
The last screen allows the user to process the selected changes in the project.
The progress of the synchronization can be monitored with the Progress Bar.
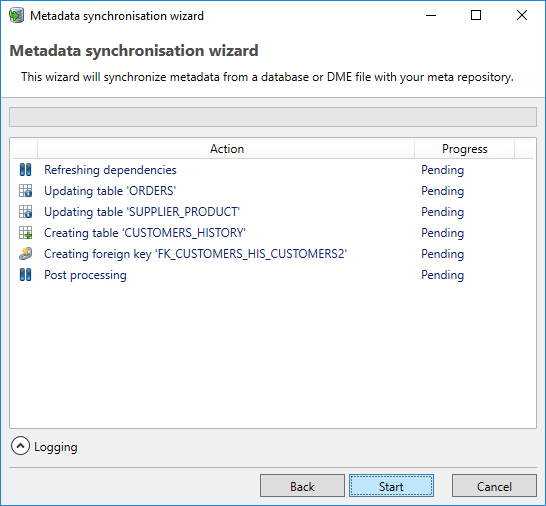
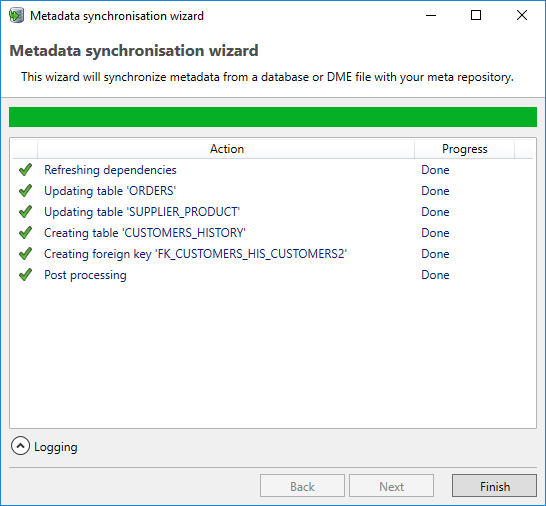
By clicking the Logging button the application shows the log file made during import. This logging also provides input for resolving any errors that occurred during synchronization.