Settings
Upon beginning a new project, the Settings screen is where we configure the base information of our Analyze project; Which database we'd like to connect to, and which analysis profiles we'd like to check against that database. Aside from that, this screen also allows the user to import metadata from the source database, and synchronize it in the event that this data has changed since the creation of a project.
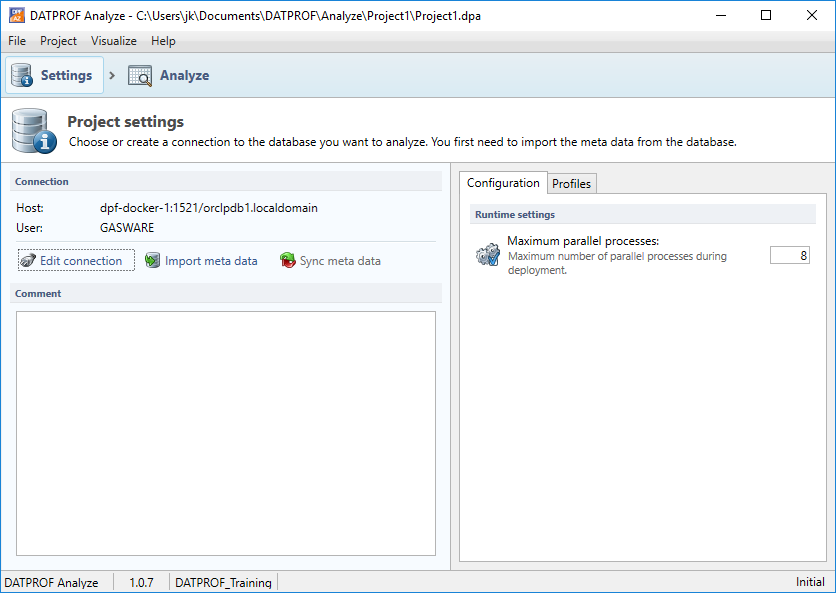
Because we need to know which database we're connecting to, a logical starting point is the Connection Editor. Let's look at that first. To open this, simply press "Edit connection".
Connection Editor
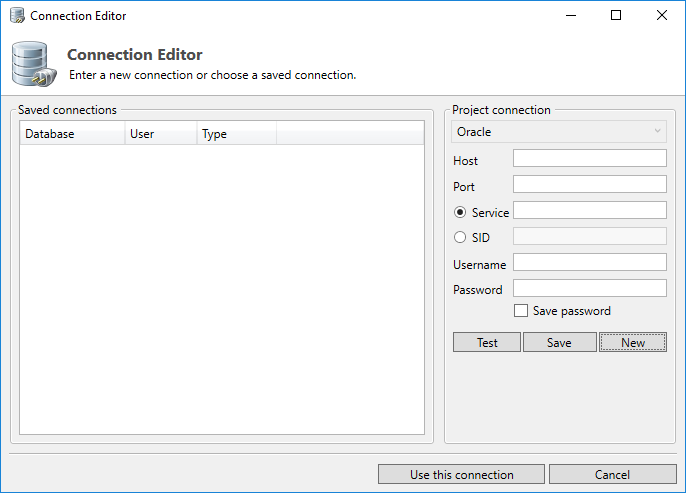
In order to analyze (parts of) a database, a connection to the database is required. This connection is used for importing and synchronizing metadata and will be used to execute the analyze functions on that database.
Datprof Analyze supports multiple types of databases, listed below:
- Oracle Database
- Microsoft SQL Server
- DB2 for Linux, Unix & Windows
- DB2 for iSeries
- MySQL/MariaDB
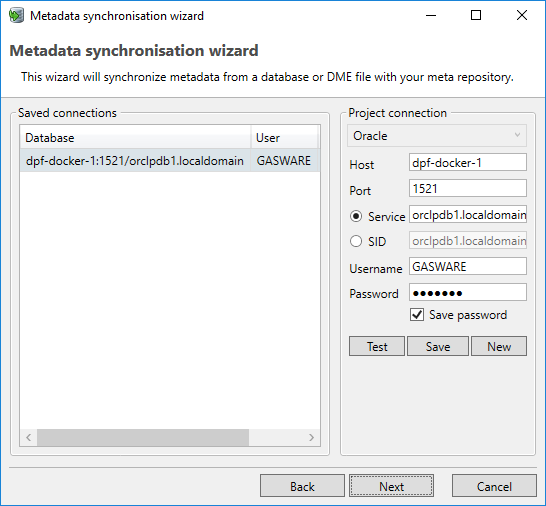
A database connection can be specified, selected and saved in the Connection Editor. On the right-hand side of this screen we can see the Project Connection. This is an overview of the database connection data used for the current project.
Managing your sensitive data when contacting DATPROF
It’s entirely possible that when depending on our staff for support of our systems, the topic of transferring your project file to DATPROF comes up. Luckily, due to the way we design our software we don’t handle the data within your database, and a project doesn’t contain any sensitive data about your datasets. However, because it’s possible to store and save the connection data to databases in our software a project file can contain privacy or security risk bearing connection data. Therefore, if you would like us to look at one of your project from a support perspective we strongly urge you to delete any existing connection data in the Connection Editor.
As this is information we have no desire to have within our system, and could contain sensitive information, we will prune this information in any event this is attached erroneously to protect our data privacy conformity. Nevertheless, it falls to the submitter of any ticket to be wary of privacy sensitive data and remove it where possible.
Project Connection
Different database types require their own specific set of variables in order to establish a connection, and thus the user has to specify which type of database they want to connect to through the drop down menu at the top of this section. Following this paragraph is a short overview per database type for which data is required for a connection. Once you're satisfied with your connection details you can either press "Use this connection" to close this dialogue while using the currently configured data, or "Cancel" to undo any changes made.
Test
Once connection parameters have been specified, pressing this button will attempt to establish a connection to the database. If this is successful the user will be greeted with a notification titled "Connection established". If this connection test fails, Analyze will attempt to return a detailed error on what happened.
Save
Once connection parameters have been specified, pressing this button will take the defined connection details and add them into the Saved Connections portion of the Connection Editor. This is a particularly useful feature if you use the same database often for different projects. Once saved, clicking the entry in the Saved Connections will auto-fill the saved connection data into the project connection tab. Then, you can simply test the connection and use it for your project. One important distinction to make is that the password is not saved by default, causing the user to have to enter the password every time Analyze is started. This can be changed by ticking "Save password".
Where are my saved connections stored?
Once a connection has been saved, it's written to a text file named "Analyze_connections.lst" in the same local environment as where Analyze is installed. Usually, this is “<Windows User>\AppData\Local\DATPROF\”. Naturally, you can replace this file or send it to other collaborators to make the process of connecting to the same database faster, in case multiple databases are used.
New
Pressing this button will empty out any connection data currently entered in the Project connection, allowing you to enter new data without having to manually empty every field.
Oracle
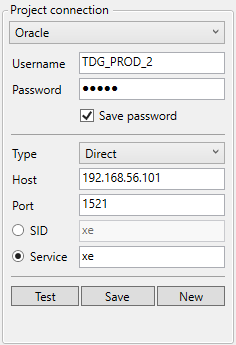
Username: The user name to login.
- Password: The password
Connection Type: Direct allows the user to enter the individual data to connect to a database. Connect Descriptor allows the user to paste a connection string to be used to validate the connection instead.
Host: Hostname or IP-address of the database server.
Port: TCP Port
SID / Service: Unique database identification.
Microsoft SQL Server
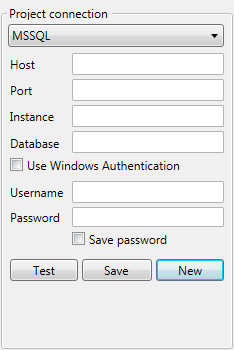
- Connection Type: MSSQL.
- Host: Hostname or IP-address of the database server.
- Port: Port of the SQL Server database.
By default this is 1433.
When empty, the default port will be used. - Instance: If a named instance is used, fill in this field with the name of the instance. This property is optional, then the default instance on the host is used.
- Database: Name of the database
Use Windows Authentication: Use your windows authentication to log on to the SQL Server database.
When Windows Authentication is left unchecked:
Username: The user name to login.
- Password: The password.
PostgreSQL

- Username: the username used on the postgreSQL database for authentication.
- Password: the password used on the postgreSQL database for authentication.
- Host: the hostname or IP address of the postgreSQL database.
- Port: the port on which the database is available. By default for PostgreSQL databases this is port 5432.
- Database: the name of database which you'd like to use in this project. This should be identical to the name in the actual database.
DB2 for Linux, Unix and Windows
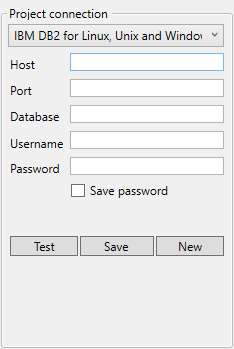
- Database type: IBM DB2 for Linux, Unix and Windows.
- Host: Hostname or IP-address of the database server.
- Port: TCP port on which the database server is listening.
- Database: Name of the target database.
MySQL / MariaDB
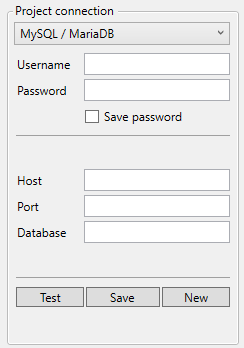
- Username: the username used on the MySQL/MariaDB database for authentication.
- Password: the password used on the MySQL/MariaDB database for authentication.
- Host: the hostname or IP address of the MySQL/MariaDB database.
- Port: the port on which the database is available.
- Database: the name of database which you'd like to use in this project. This should be identical to the name in the actual database.
Configuration, Profiles and Comments
Now that we've gone over most of the basic functionality, let's take a look at the Configuration tab, the Profiles tab, and Comments.
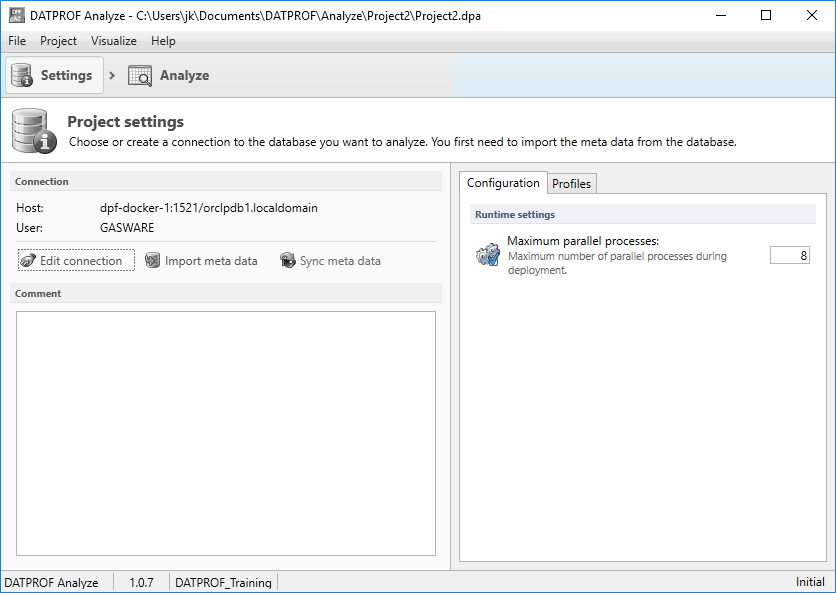
Configuration
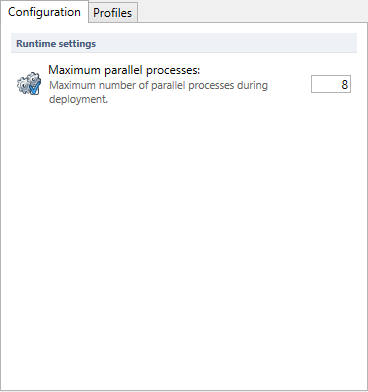
Analyze attempts to maximize performance by running multiple parallel processes. This is a way to execute multiple different processes at the same time by opening multiple connections to the database. This is a value you can tweak yourself. The more parallel processes, the faster Analyze will run. Excessively high numbers of parallel processes can cause some unwanted behavior during execution of templates depending on the specifications of your local database and server hardware. By default this is set at 8. For most use-cases, this is plenty. If you experience issues during deployment (Deadlocks are a good example), a good first step can be to turn down the number of parallel processes to see if this impacts the deployment of a template.
Setting maximum parallel processes to 1
If you set the maximum allowed parallel processes to 1 the performance of any project will tank considerably, as this is an incredibly inefficient way of performing tasks. Therefore, we don't advise ever doing this aside for if you need to test certain performance related issues.
Profiles
Profiles are expressions which allow you to identify your data. What this means in layman's terms is that you create a function which checks a certain condition, and if this condition is true it will mark any location in the database (per table column) where this condition is true. This may sound daunting at first, but once you understand the core reasoning behind these profiles these become self-explanatory. Profiling is primarily a tool made to identify the location of (sensitive) data, and not meant to address data quality issues. This is an important distinction to make. Using profiles allows us to see where potential problems lay in our data. After this, it becomes easier to resolve such issues manually through SQL commands or other means, or report the findings to others. As such, profiles are also an easy way to visualize to a layman which database columns have potential issues.
In order to start executing our profiles we need to know (roughly) what our database looks like. This can be done by Gathering statistics. This is explained in the chapters to come. Once this is done, we can start taking a look at how to configure our profiles. Below is an image of what a typical profile configuration might look like.

Let's take a look at the various fields and how to enter them to get the most out of their usage.
Profile name
This is the actual name given to a profile. This is also the text that will later be displayed on any column that fulfills this profile's criteria. As such, it's important to give profiles a short, descriptive name that explains what a fulfilled condition means on a column.
Examples of profile names
Let's imagine we're trying to build a profile that checks whether a column contains IBAN (European bank account) numbers. An example of a bad name would be something like "Regex1" or "Profile1", as this name showing up on a specific table doesn't actually tell the user anything. A good name would something along the lines of "IBAN_PRESENT". This conveys to the user in a glance what's wrong with a marked column without having to check the profiles tab.
Type
There are three types of profiles present within Analyze, each described briefly below.
Values
The type Values checks whether one of the given values is exactly present in the database. An important distinction here is that this only returns as True when the exact value is found in a column. This is mostly used for columns where you know exactly what can be entered, or have data that is recurring. Examples of this would be gender, multiple-choice data fields, etc etc.
Examples of values
If we configure our profile to check for value spaghetti, it will go through any column in search of rows that contain spaghetti, and only spaghetti. If a column contains the defined value plus additional information, it does not match. For instance, if this profile would check a column with content "spaghetti bolognese", it would return as False.
Contains
The type Contains checks whether (part) of the definition is present in any column. This does not require an exact match. If you're looking for a specific value which always starts with a specific string of text or number series, this can help you sort through large text fields quickly.
Examples of contains
If we configure our profile to check for contains spaghetti, it will go through any column in search of rows that contain spaghetti anywhere in the field, even if other data is also present in the field. If a column contains the defined value plus additional information, it will still match. For instance, if this profile would check a column with content "spaghetti bolognese", it would return as True.
Regex
Regex (Regular Expression) is a way to search within text strings, and is a widely used standard which can be consulted on http://www.rexegg.com/. Using regular expression allows a user to define very specific functions which check for certain patterns within columns.
Definition
A definition is either one of multiple values to check against, or a regular expression function. For Values and Contains, when supplying multiple strings to check against, it is important to realize that Analyze expects a few things:
- Commas between values to be checked for.
- No spaces between values or commas. In order to use multiple values follow this example → Value1,Value2,Value3,Value4
- No spaces at the end of a collection of values.
For Regex type profiles this is where you paste your regular expression.
Percentage
A function has to be supplied a percentage. This percentage is the amount of positive returns within a specific column before the profile is applied to it. The usage for this is to determine how much of a specific occurrence is considered significant. For instance; it can be reasonably expected that for certain profiles, it's not interesting to mark a column as faulty if only 2% of columns contain matching values.
Examples of percentages
Imagine we define a profile which checks whether a column contains "spaghetti". A configuration of that would look like the following:

If we run profiling on a database, it will check all columns whether at least 40% of all rows of that column contain "spaghetti" anywhere in it. If this is the case, a profile will be applied to that column.
If a column named Italian_Recipes contains 1000 rows, and 350 of them contain the word "spaghetti", then the profile is not applied. This is because 350/1000 rows = 35%, which is less than the 40% we specified.
If the same column contained 400 rows that did contain "spaghetti", it would apply the profile to this column. If the same columns contained 500, 800, or even all rows, it would also apply the profile.
Description
The description field allows you to enter a description for what your profile is meant to do or other information regarding it. This is a simple text field.
Comment
Here you can enter your comments to keep track of the work you have done on any given project.

Importing Metadata
Using the button Import metadata (or using the top-left menu option Project → Import and synchronize → Import metadata wizard), a wizard for importing meta data of the specified database is started. Importing the metadata through this wizard consists of three steps:
- Selecting which tables and to import (and from which schema)
- Selecting which foreign keys to import;
- Starting the metadata import.
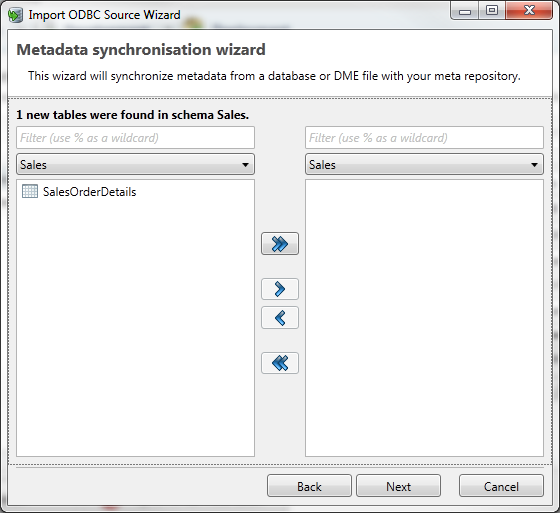
Step 1: Selecting the schemas and tables
During this first step, the user can select the tables to be imported. The screen consists of two halves.

The left part shows the metadata available in the database. In the drop-down box (top left) the scheme containing the tables can be selected. In the list below the user can select one or more tables which will be imported.
The right part shows the selected tables to imported.
With the single arrow ( > ), the selected tables are added to the list of tables to import. The double arrow ( >> ) will add all tables from the selected schema in the list of tables to import.
The Next button moves the wizard to the next step, selecting all tables moved to the right-hand side as tables to be imported.
Step 2: Selecting relations (foreign keys)
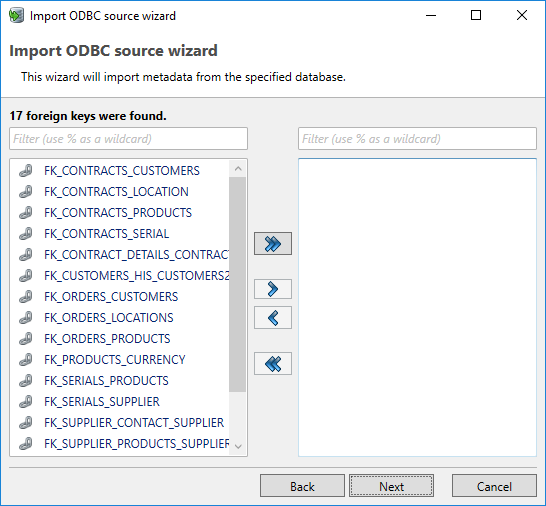
The next dialog allows the user to select the foreign key relations (FKs) to import. This dialog has the same format as the previous dialog. The list of available FK’s are derived from the selected tables. Again, the user can select one or more FK’s and add them to the list FK’s to import.
Normally, it's desirable to import all foreign key relations.
The Next button moves to the next step.
Step 3: Importing the specified metadata
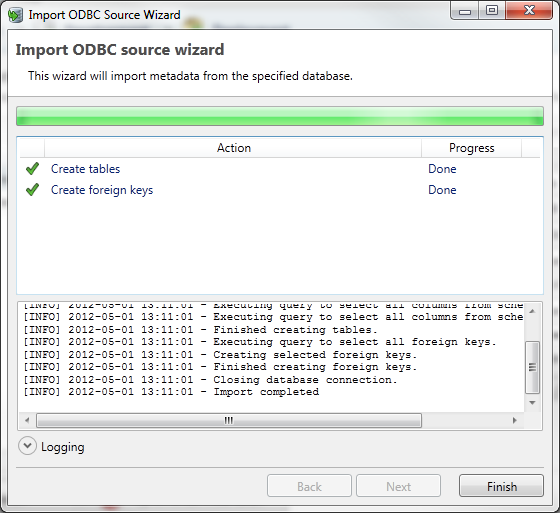
The last dialog of the wizard allows the user to actually import the selected metadata (tables and FKs). By clicking on Start, the application will retrieve the selected metadata from the database.
The progress of the import can be monitored with the Progress Bar.
By clicking on Logging, the application shows the logging during import. This logging also provides input for resolving any errors that occurred during the import.
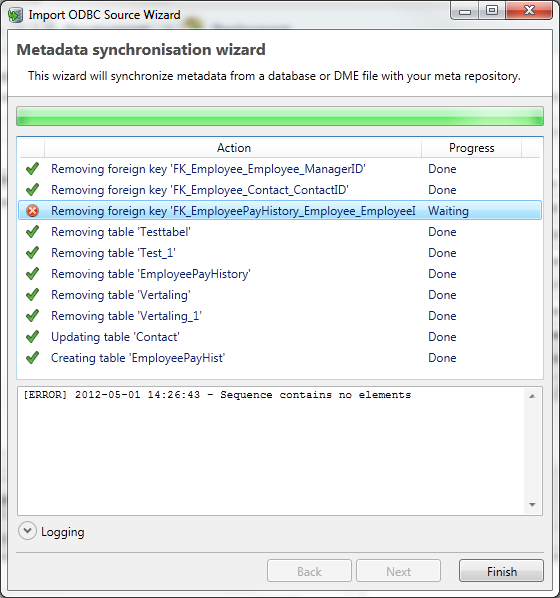
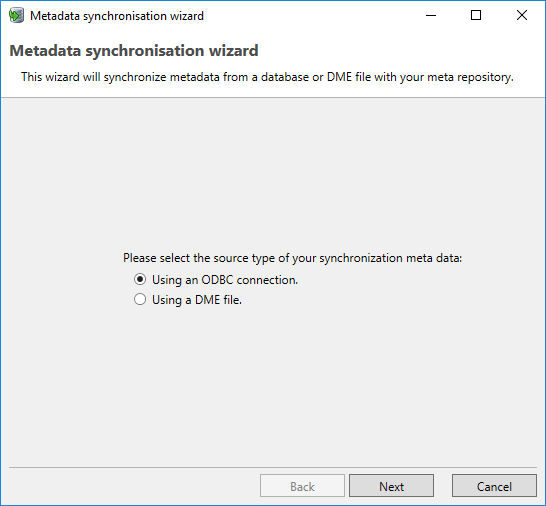
Synchronizing metadata
The Metadata Synchronization Wizard helps the user to process any changes to the data model of the target database, ensuring that anonymization can be executed on a changed data model. Synchronization can take place through a DME file or an ODBC database connection (Project Connection).
In the example below we use the ODBC Database connection.
The following screen shows a summary of the differences between the metadata from the target database and the metadata already imported into the application.
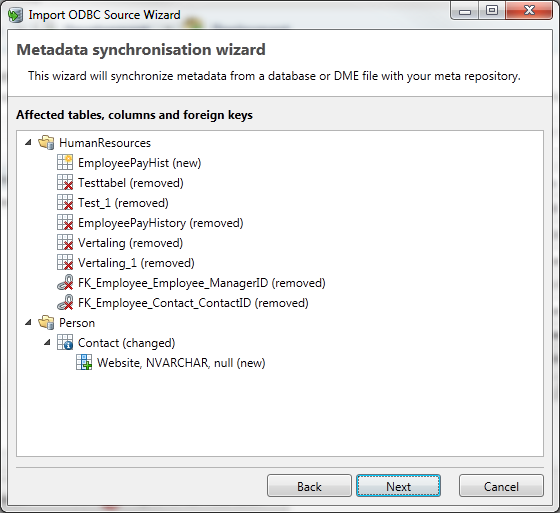
Changes may include tables, columns and Foreign Keys. In time they can be added, changed or deleted.
The Synchronization wizard does not distinguish between self-defined Foreign Keys and removed Foreign Keys from the database. They are both marked for deletion in the wizard.
By clicking next, a dialog will be opened for each type of change, where the user can decide whether he wants to process the change in his project.
These dialogs have the same format as the dialogs for importing metadata.
The last screen allows the user to process the selected changes in his project.
The progress of the synchronization can be monitored with the Progress Bar.